

This website views at its very best in Firefox web browser, and is not available in a mobile version.
Copyright © All Rights Reserved | Built by Serif Templates


|
|
|
|
|
|
|
The ik_wheel effect has been with RCT3 since Vanilla where it's used on the Water Tricycles in addition to eight of the cars that come with the tracks that are categorized with Other Rides and Attractions. |
||||
|
|
|
|
|
|
|
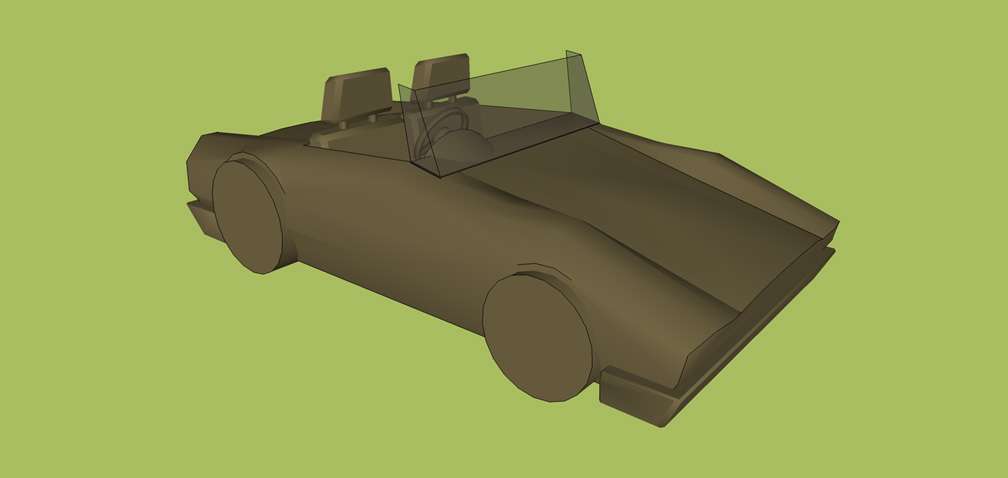
This effect is the solution to turn to when you want larger, high quality wheels that better complement your car's appearance. While your car model is in development it's best to start out with these wheels all- |
||||
|
|
|
|
|
|
|
|
||||
|
After you're satisfied with the size & scale of the car, the guests' placement in the car, and the way the car operates around the track then we may treat our wheels as a separate entity, apply a special texture, and re- |
||||
|
|
|
|
|
|
|
We need four wheels for this car so lets begin naming our bones. We'll need one bone for each wheel: |
||||
|
|
|
|
|
|
|
|
► |
ik_wheel01 |
||
|
|
► |
ik_wheel02 |
||
|
|
► |
ik_wheel03 |
||
|
|
► |
ik_wheel04 |
||
|
|
|
|
|
|
|
You will recall when we made our alpha stack wheels for rails that there were three wheel types in each arrangement of wheels: a top wheel, a side- |
||||
|
|
|
|
|
|
|
|
► |
ik_wheel01lt |
||
|
|
► |
ik_wheel02rt |
||
|
|
► |
ik_wheel03lt |
||
|
|
► |
ik_wheel04rt |
||
|
|
|
|
|
|
|
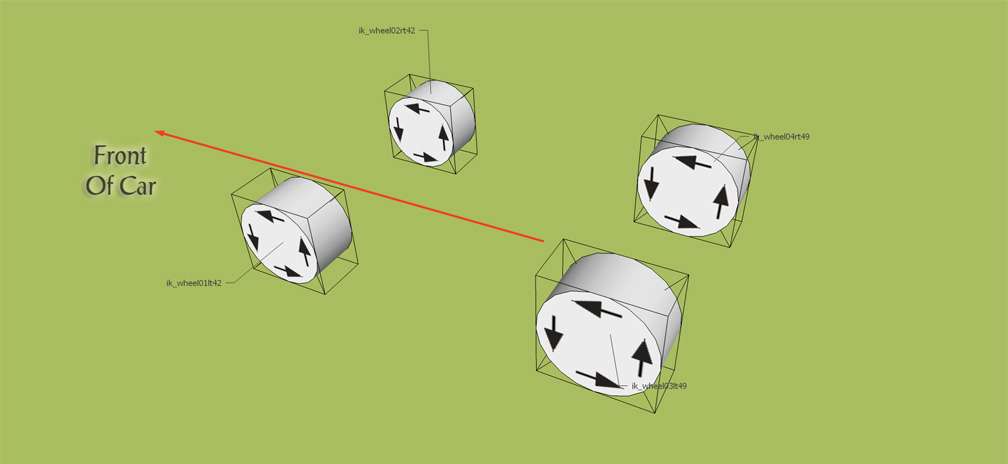
Finally we need to add the diameter of the wheel. As the unit of measurement in our modeler is metric we need to determine this value in centimeters. This sports car has large mag wheels in the rear with smaller ones at the front so having measured them in SketchUp we'll add these measurements to our bone names: |
||||
|
|
|
|
|
|
|
|
► |
ik_wheel01lt42 |
||
|
|
► |
ik_wheel02rt42 |
||
|
|
► |
ik_wheel03lt49 |
||
|
|
► |
ik_wheel04rt49 |
||
|
|
|
|
|
|
|
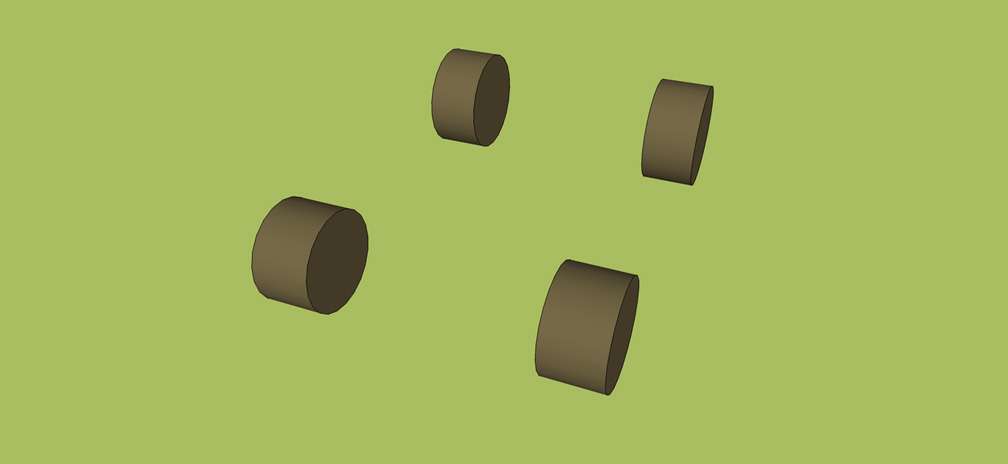
Now that our bone names are complete we need to get each wheel ready for Importing so let's hide our sports car to leave only the wheels in view. |
||||
|
|
|
|
|
|
|
|
||||
|
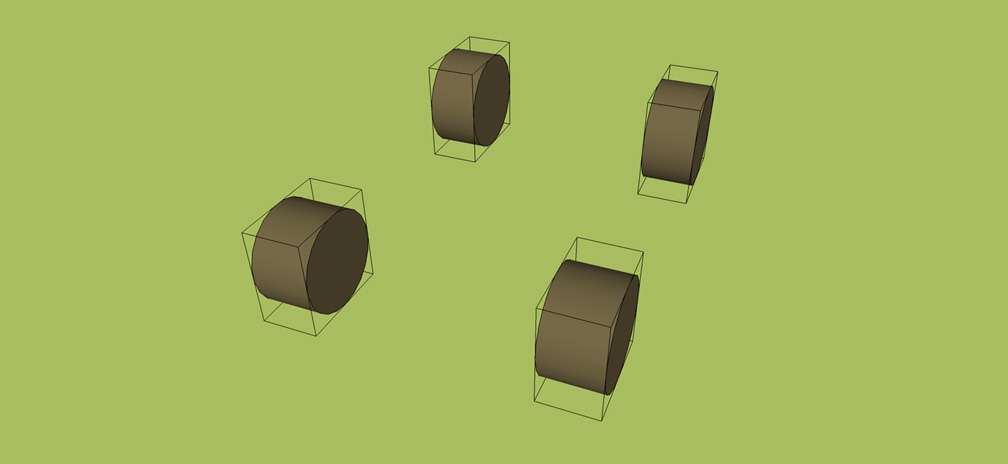
There's not much point in taking the time to craft a sports car exactly to our specifications if we're after that going to attempt to use alpha stacks made up of twenty polys each to create wheels that only give the appearance they're this size & shape so it was essential for the overall look of the car that the wheels be solid shapes. These rounds each have twenty- |
||||
|
|
|
|
|
|
|
It's necessary to find the exact center of each wheel so what we need to do next is to draw some lines around each wheel as if we're making a cage. The wheel should be entirely enclosed in the cage with no bits sticking out at the top, bottom, or sides. Likewise the cage should be form- |
||||
|
|
|
|
|
|
|
|
||||
|
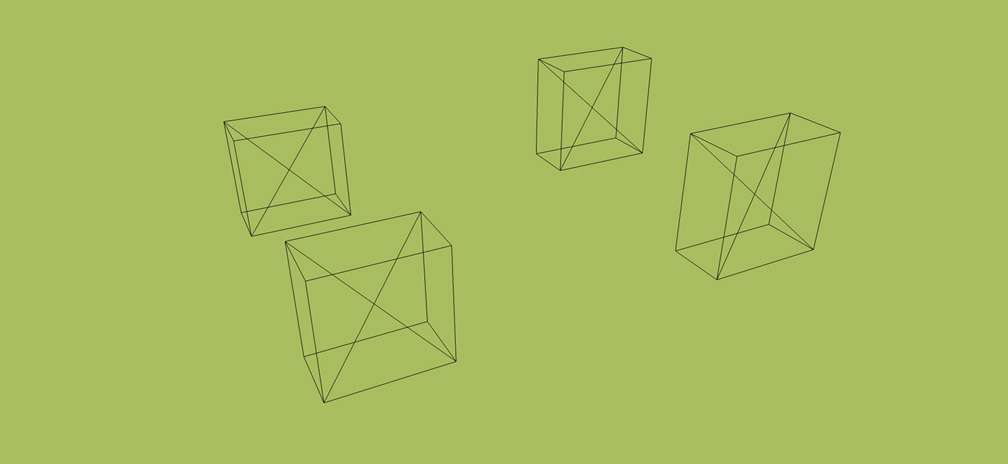
Now we'll hide the wheels and draw crossed lines from the top left down to the bottom right of each cage. |
||||
|
|
|
|
|
|
|
|
||||
|
In doing that we've just marked out the exact center of each cage. Our bone effects need to be placed on these centers. You'll have no problem getting the Text Labels making up your Bone Effects to snap to the crosshairs you’ve created in this way. |
||||
|
|
|
|
|
|
|
|
||||
|
Finally, we'll un- |
||||
|
|
|
|
|
|
|
|
||||
|
There is one final thing we need to consider and that's to understand that ik_wheels rotate in SketchUp around the Z axis. To achieve this, in SketchUp we need to separately rotate each of our wheels 90°around the X axis after which they'll be in a position where they'll rotate around Z. You'll recall we previously illustrated the various plus and minus rotation directions. The same directions apply here now it's time to rotate our wheels. |
||||
|
|
|
|
|
|
|
|
||||
|
Groups in our modeler are identified as meshes in the Importer. Each wheel mesh needs to be linked to its corresponding bone in the Importer, so each wheel needs to be grouped and given a different group name so it can be identified by the game engine and rotated at the correct speed in relation to its position on the car and the car's position on the track. We've given our wheel groups basic names so they'll be easy to identify while importing: |
||||
|
|
|
|
|
|
|
|
► |
Wheel01FrontLeft |
||
|
|
► |
Wheel02FrontRight |
||
|
|
► |
Wheel03RearLeft |
||
|
|
► |
Wheel04RearRight |
||
|
|
|
|
|
|
|
Now all that's left to do is to un- |
||||
|
|
|
|
|
|
|
|
||||
|
Of course you'll know by now that to Import your car you'll: |
||||
|
|
|
|
|
|
|
|
► |
set up the car as an animated model, |
||
|
|
► |
add your textures, |
||
|
|
► |
delete the ticks from the Bones dialog boxes at the mid right in the Edit Animated Model Settings dialog and then click on the A to add the Effect Bones, and |
||
|
|
► |
link your meshes with your textures. |
||
|
|
|
|
|
|
|
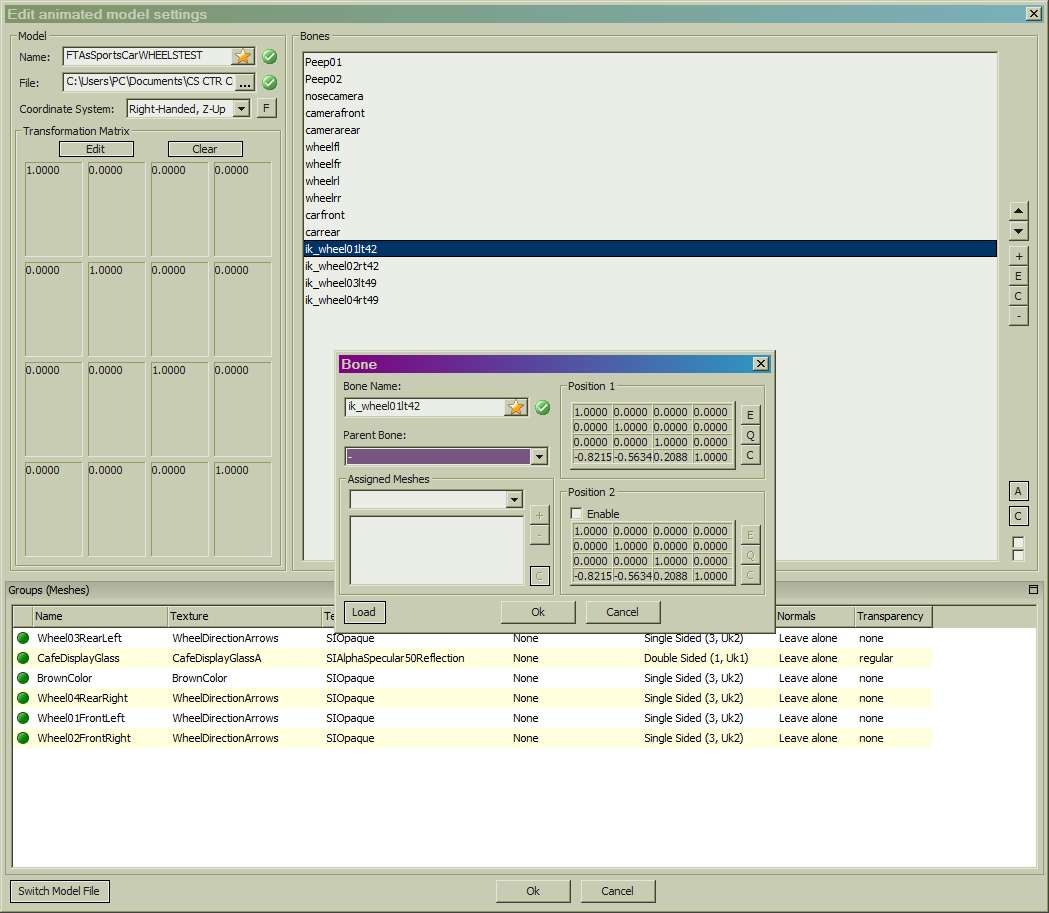
While importing trackbed wheels is the same process as we outlined above for Importing wheels for rails there is one difference. That difference is here in the Animated Model Settings Dialog. |
||||
|
|
|
|
|
|
|
|
||||
|
We'll start by selecting the first bone, for ik_wheel01lt42. |
||||
|
|
|
|
|
|
|
|
||||
|
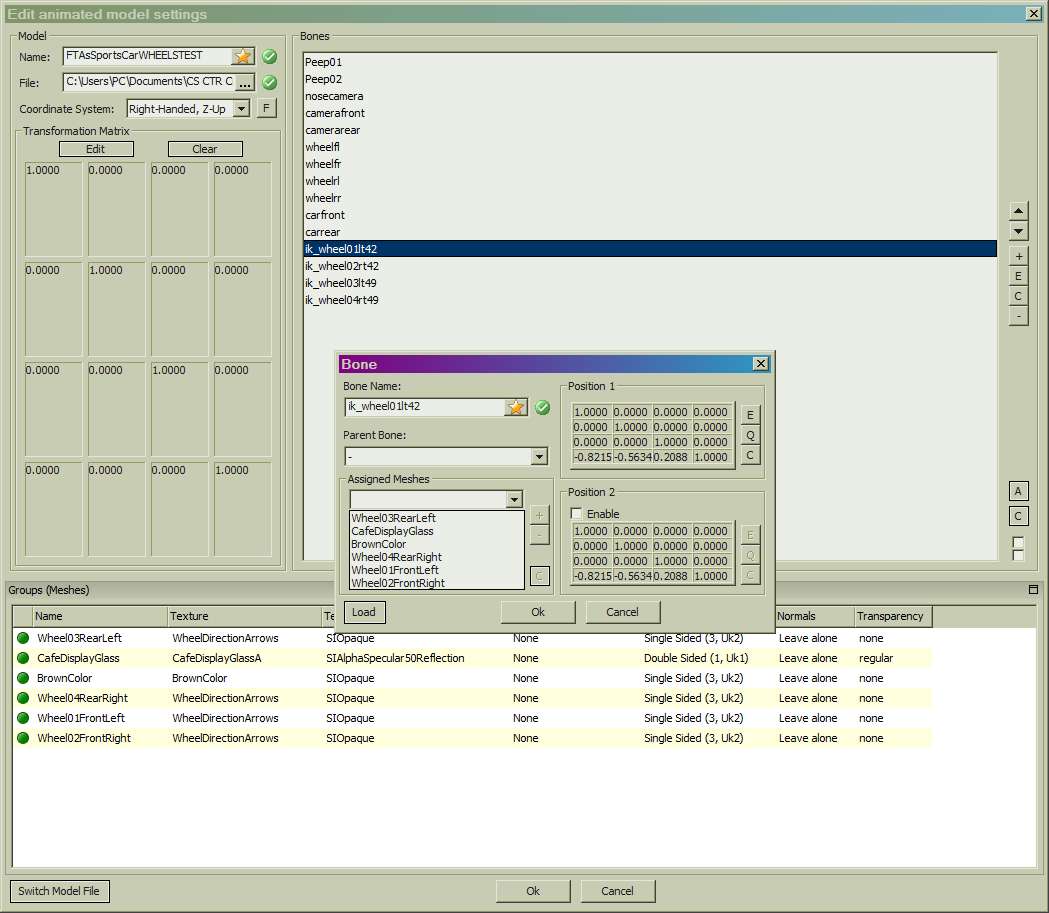
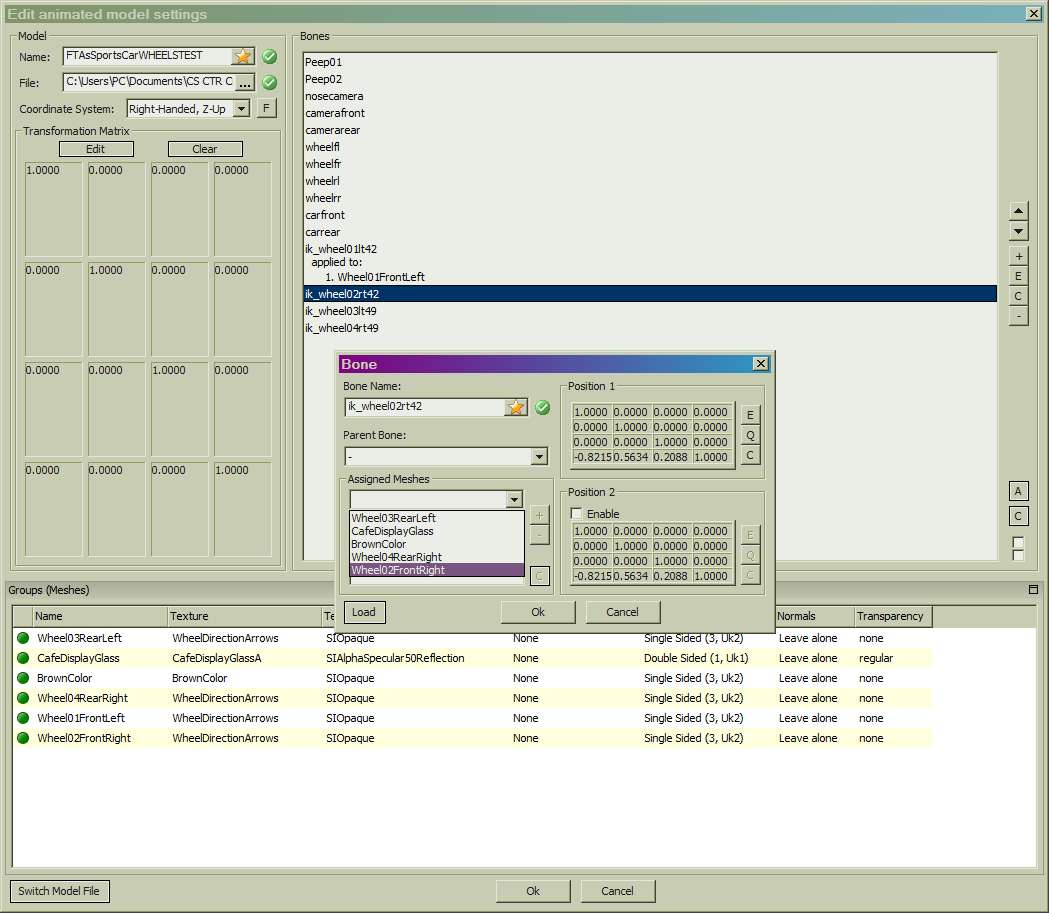
We need to assign a mesh to the bone here in the Bone dialog that's now on display. Use the downwards facing arrowhead at the right of the Assigned Meshes field to open the drop- |
||||
|
|
|
|
|
|
|
|
||||
|
There you'll observe that each of the group names we gave our wheels in the modeler is identified here as it's own mesh ready for assigning. We've given our groups simple to understand names in our modeler so we know at a glance that the Wheel01 mesh is to be assigned to the ik_wheel01 bone and we'll just do that now. |
||||
|
|
|
|
|
|
|
|
||||
|
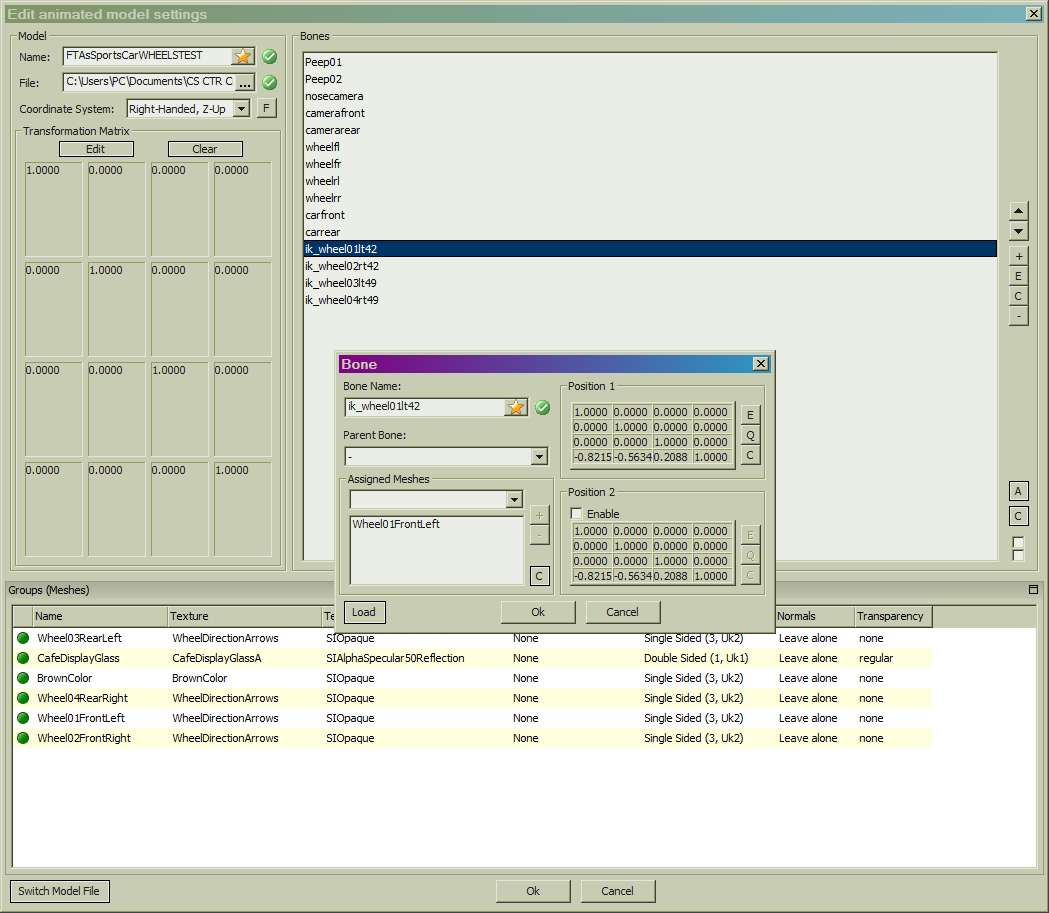
Here our mesh is only selected. We need to add it to the bone how so we'll left- |
||||
|
|
|
|
|
|
|
|
||||
|
From merely being highlighted in the list our mesh has moved down into the next field showing that it now been assigned to the bone we selected. If we left- |
||||
|
|
|
|
|
|
|
|
||||
|
When we select our second bone, ik_wheel02, in the Bone window that displays we can see that because the Wheel01FrontLeft mesh has been assigned to ik_wheel01 that it is no longer available in this list. |
||||
|
|
|
|
|
|
|
|
||||
|
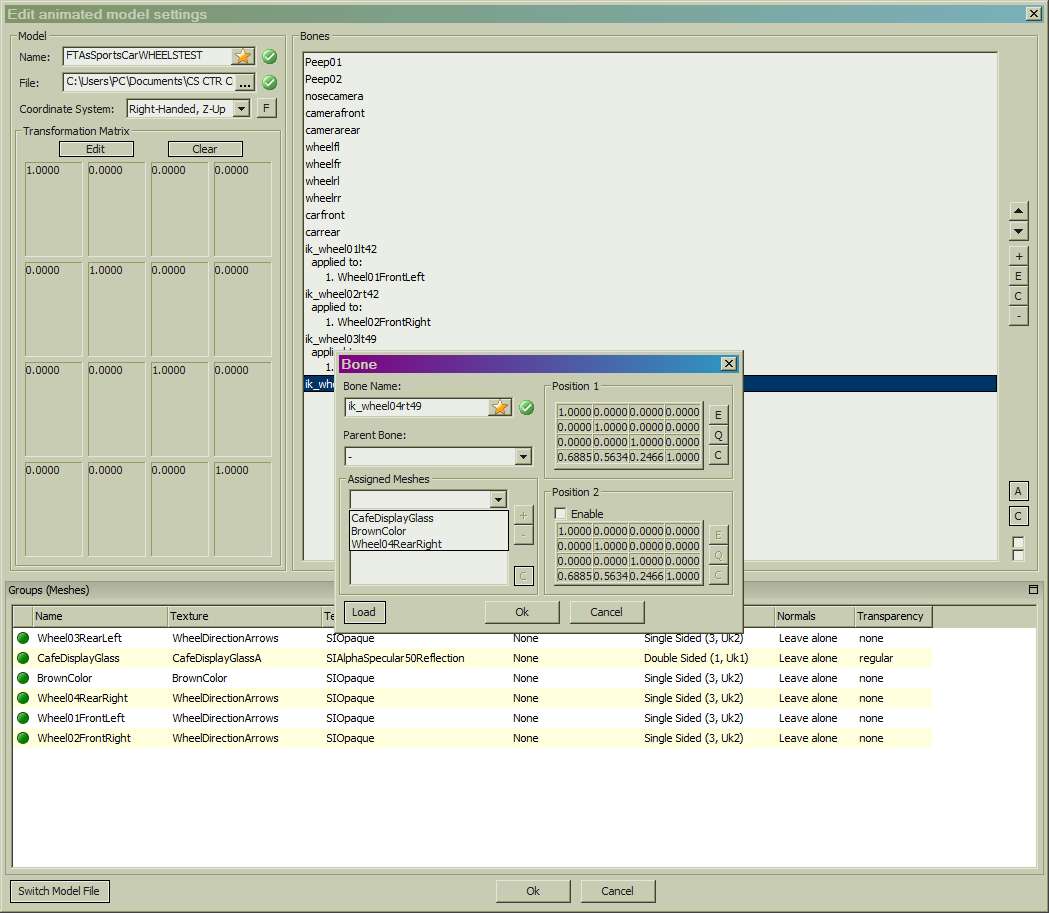
This is a safeguard built into the Importer to prevent us erroneously assigning the same mesh to several bones. By the time we work our way down through this list, when we come to assigning the final mesh there's only one left there in the list. |
||||
|
|
|
|
|
|
|
|
||||
|
While the Glass texture and the Brown texture are indeed meshes we don't want to assign them to any ik_wheel bone so we can just ignore those while we're here in the Bones dialog. |
||||
|
|
|
|
|
|
|
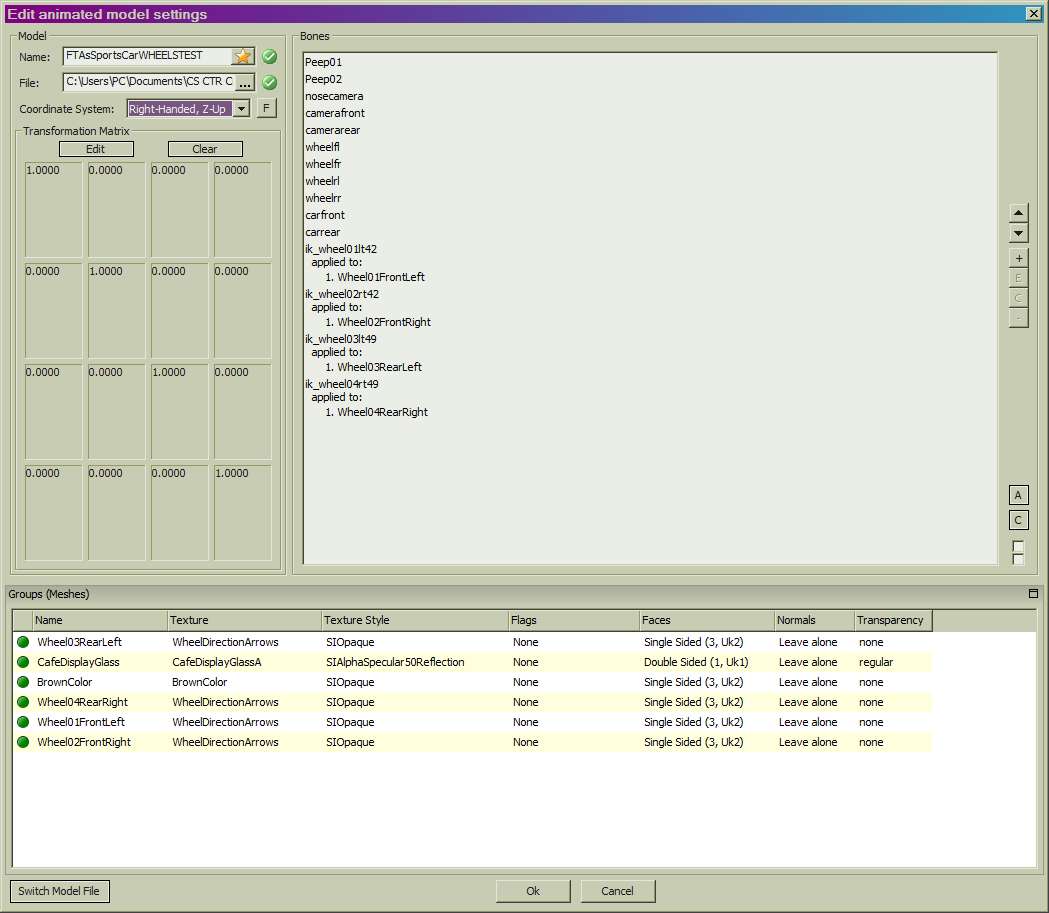
And there we are, meshes now assigned to all our bones. |
||||
|
|
|
|
|
|
|
|
||||
|
Finish up the Importing process as usual to complete Importing your car model with rotating wheels. As a memory refresher: |
||||
|
|
|
|
|
|
|
|
► |
set up the LOD's, |
||
|
|
► |
enter the name of your ASE file in the Name field, |
||
|
|
► |
select the path to where you want the OVL saved, |
||
|
|
► |
remove the Prefix, and |
||
|
|
► |
Import. |
||
|
|
|
|
|
|
|
And then with CTR Creator |
||||
|
|
|
|
|
|
|
|
► |
create your car OVLS with CTR Creator and |
||
|
|
► |
Install your car OVL's in Cars>TrackedRideCars folder. |
||
|
|
|
|
|
|
|
If you haven't done so already you'll need to create a BahnDaten_ TXT file to make a track on which to operate your car in the game. |
||||
|
|
|
|
|
|
|
|
► |
select the track type with which you'd prefer to test, |
||
|
|
► |
complete a BahnDaten_ TXT file, |
||
|
|
► |
Create your track OVLS with CTR Creator, and finally |
||
|
|
► |
Install your track OVL's in Tracks>TrackedRides. |
||
|
|
|
|
|
|
|
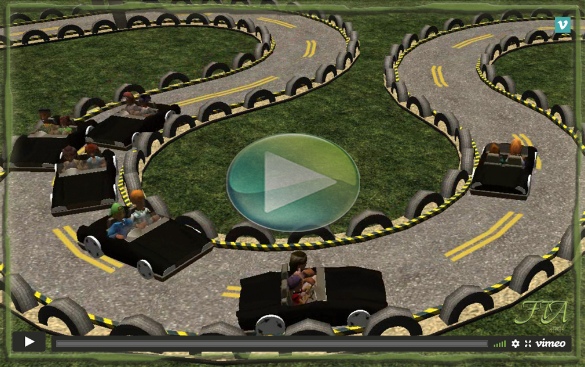
Now you may enjoy your car with rotating wheels. |
||||
|
|
|
|
|
|
|
|
|
|
|
|
|
Drag the above toggle to a convenient place on your screen. |
|
|
|
|
The Ultimate CTR Creator


| Viewing Full-Sized Images On This Website |
| Effective Park Design: The Best Start For Your Park, Page 2 |
| Master Maps And Guest AI, Page 2 |
| Guest Generation, Park Capacity, And Peep Factory, Page 2 |
| Setting Up And Switching Your Park Entrance, Page 2 |
| Theming Our Stalls & Facilities, Page 2 |
| Our VIP Blue Book, Page 2 |
| Our VIP Blue Book, Page 3 |
| Our VIP Blue Book, Page 4: Spot The VIP's |
| Volitionist's RCT3 Animal Care Guide, Page 2 |
| Volitionist's RCT3 Animal Care Guide, Page 3 |
| Volitionist's RCT3 Animal Care Guide, Page 4 |
| How To Unlock All Campaign Scenarios, Page 2 |
| The Care And Feeding of Custom Downloads, Page 2 |
| The Care And Feeding of Custom Downloads, Page 3 |
| The Care And Feeding of Custom Downloads, Page 4 |
| RCT3 Cheats & Unlockables, Page 2 |
| Options.txt Flags, Page 2 |
| Options.txt Flags, Page 3 |
| RCT3 Keyboard & Mouse Controls: Advanced |
| RCT3 Keyboard & Mouse Controls: Freelook |
| RCT3 Keyboard & Mouse Controls: Isometric |
| RCT3 Keyboard & Mouse Controls: Normal |
| Guests Departing The Station But Not Returning |
| Guests Knocked Over |
| People Spilling Down Stairs |
| Lost Staff |
| ReAppearing Invisible Vendors |
| Park File Thumbnails |
| RCT3 Freezes |
| Earthquakes and Plumbing |
| The Importer |
| SketchUp |
| Reviewing RCT3’s History, Page 2 |
| Chris Sawyer, Page 2 |
| Showcase!: Fall 2020, TNS Pool Paths & TNS Pool Terrain, Page 2 |
| Showcase!: Fall 2020, TNS Pool Paths & TNS Pool Terrain, Page 3 |
| Showcase!: Fall 2020, TNS Pool Paths & TNS Pool Terrain, Page 4 |
| Showcase: Spring 2019 - DasMatze's Fences & Railings, Page 2 |
| Showcase: Spring 2019 - DasMatze's Fences & Railings, Page 3 |
| Showcase: Spring 2019 - DasMatze's Fences & Railings, Page 4 |
| Showcase: Fall 2018 - L-33/Lee, Page 2 |
| Showcase: Fall 2018 - L-33/Lee, Page 3 |
| Showcase: Fall 2018 - L-33/Lee, Page 4 |
| Showcase: Spring 2018 - Spez Mies Wall Set, Page 2 |
| Showcase: Winter 2017 - Mr. Sion's Tiki Bar, Page 2 |
| Showcase: Fall 2017 - Polynesian Panic, Page 2 |
| Hall of Fame: Belgabor's Invisible Doodads |
| Hall of Fame: Spice's Invisible Pool CS |
| Hall of Fame: GTT's Hedge Maze |
| Hall of Fame: GTT's Glas Labyrinth |
| Hall of Fame: Joey's Park CleanUp |
| Hall of Fame: GTT's Hedge Maze, Page 2 |
| My Adventures In SketchUp |
| CSO's I Have Imported |
| TexMod Customized Add-Ins |
| My Parks |
| Videos |
| Screenshots |
| Advertisement Land |
| Intrepid: A Revolution In Design |
| Structure And Ride Supports Set |
| CSO Study: GTT’s Hedge Maze |
| Wonderland Themed Playing Card Railings |
| Architectural Chess |
| Mini Chess |
| Planters 'n' Fountains Set |
| Intrepid: A Revolution In Design, Page 2 |
| Intrepid: A Revolution In Design, Page 3 |
| Intrepid: A Revolution In Design, Page 4 |
| Structure And Ride Supports Set, Page 2 |
| Café, Update 1 |
| Path Add-Ons, Update 1 |
| Planters And Pool Fencing, Page 2 |
| Landscaping And Park Grounds, Page 2 |
| Walls, Tunnels, And Fences, Page 2 |
| Decking, Stairs, And Balustrades Set, Page 2 |
| Decking, Stairs, And Balustrades Set, Page 3 |
| CFR & CTR CSO's, Page 2 |
| CFR & CTR CSO's, Page 3 |
| CFR & CTR CSO's, Update 1, Page 1 |
| CFR & CTR CSO's, Update 1, Page 2 |
| TexMod Tutorial |
| My TexMod Skies |
| TexMod MakeOvers For My Park |
| TexMod MakeOvers For My Park, Page 2 |
| Vanguard West |
| Vanguard West: Financial Report |
| Hillside On The Lake |
| Hillside On The Lake: Financial Summary |
| A Woodland Clearing |
| Vanguard West, Page 2 |
| Vanguard West, Page 3 |
| Vanguard West, Page 4 |
| Vanguard West, Page 5 |
| Vanguard West, Page 6 |
| Vanguard West: Financial Report, Page 2 |
| Vanguard West: Financial Report, Page 3 |
| Hillside On The Lake, Page 2 |
| Hillside On The Lake, Page 3 |
| Hillside On The Lake, Page 4 |
| Hillside On The Lake, Page 5 |
| Hillside On The Lake, Page 6 |
| Hillside On The Lake: Financial Summary, Page 2 |
| Hillside On The Lake: Financial Summary, Page 3 |
| Hillside On The Lake: Financial Summary, Page 4 |
| Hillside On The Lake: Financial Summary, Page 5 |
| A Woodland Clearing, Page 2 |
| Screenshots, Page 2 |
| Screenshots, Page 3 |
| Screenshots, Page 4 |
| Screenshots, Page 5 |
| Advertisement Land, Page 2 |
| Collaborations - Custom Content |
| Collaborations - Parks |
| L-33's POE Building 4 Set |
| RCT2 Wonderland Themed CSO's |
| The Crüe |
| L-33's POE Building 4 Set, Page 2 |
| RCT2 Wonderland Themed CSO's, Page 2 |
| POE Building 4 Set Presentation Park |
| POE Building 4 Set Presentation Park, Page 2 |
| POE Building 4 Set Presentation Park, Page 3 |
| POE Building 4 Set Presentation Park, Page 4 |
| POE Building 4 Set Presentation Park, Page 5 |
| How To Use Park CleanUp, Page 2 |
| How To Use Park CleanUp, Page 3 |
| Park Admission, Ride Pricing, And EI&N, Page 2 |
| Maximizing Your Small Park's Real Estate, Page 2 |
| Park Shuttle Configurations, Page 2 |
| Elevated Coaster Stations And Access Options, Page 2 |
| Suspended Pools And Guest Access Options, Page 2 |
| Terrain Painting - Artistry In Landscaping, Page 2 |
| Terrain Painting - Artistry In Landscaping, Page 3 |
| How To Build A Great Park, Page 2 |
| Optimize Your System And Enhance Your Gaming Experience, Page 2 |
| Custom Scenery |
| TexMod ReTexture Packs |
| Miscellaneous |
| Parks, Scenarios, & Sandboxes |
| Coasters, Rides, & Attractions |
| Structure And Ride Supports - Original Concrete |
| Structure And Ride Supports - Hewn Brick |
| RCT2 Wonderland Themed Set |
| RCT2 Revival Crüe Chess |
| FTA's Invisible Stall With Invisible Vendor |
| RCT3 Launch Screen Slideshow Template |
| Dark Ride Enclosure Toppers |
