

This website views at its very best in Firefox web browser, and is not available in a mobile version.
Copyright © All Rights Reserved | Built by Serif Templates


|
|
|
|
|
|
|
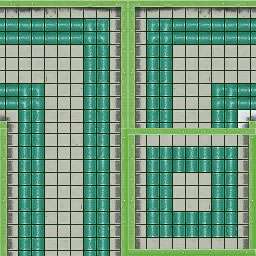
The queue texture is divided into four parts. We’ve demonstrated this with the in- |
||||
|
|
|
|
|
|
|
|
||||
|
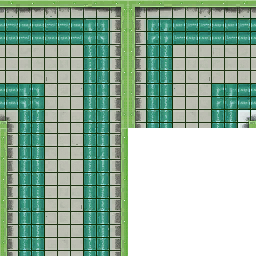
The texture at the bottom right quadrant is not necessary because queues don’t intersect; they lead into paths, lead into ride entrances, they only place in straights, in straight slopes, in left turns, and in right turns. The bottom right quarter of this image may be left blank. Do take care that your left turn and right turn textures are facing in the correct direction. |
||||
|
|
|
|
|
|
|
|
||||
|
You’ll add the three queue textures into your queue texture map the same way you added your four path textures into your path texture maps. |
||||
|
|
|
|
|
|
|
Ground- |
||||
|
|
|
|
|
|
|
After you’ve gotten this far in either your path project or your queue project, click on the arrow at the bottom right of the utility interface. This brings us to the final stage in our project. |
||||
|
|
|
|
|
|
|
|
||||
|
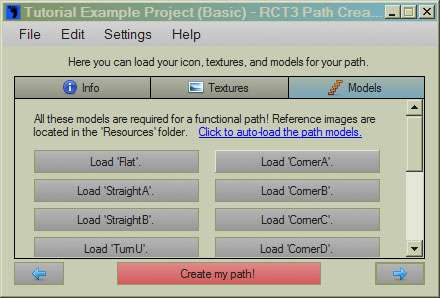
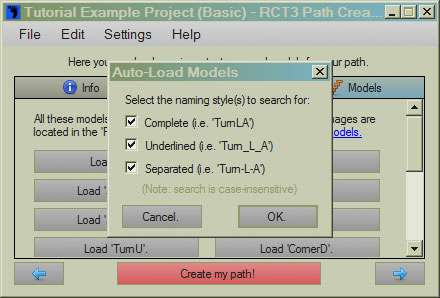
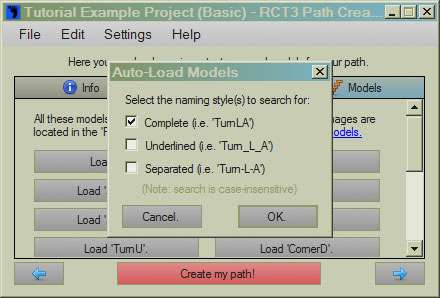
According to the blue header bar now is the time to add our models. Because we’ve already pre- |
||||
|
|
|
|
|
|
|
|
||||
|
All the boxes display already checked by default. Simply uncheck the boxes indicating the naming conventions you haven’t used, leaving in place the naming convention that you have used. |
||||
|
|
|
|
|
|
|
|
||||
|
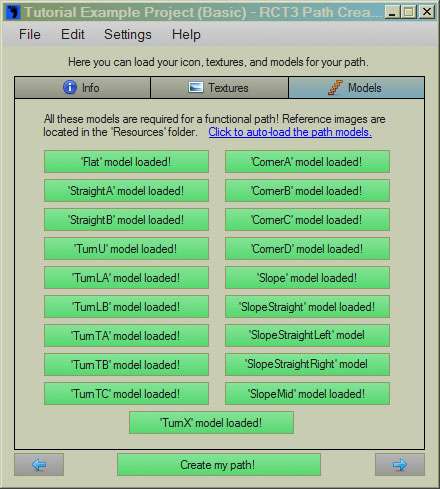
Here’s what our display looks like now we’ve selected our chosen naming convention and have loaded our path models: |
||||
|
|
|
|
|
|
|
|
||||
|
You’ll see there at the bottom of the display that the Create my path! Tab is now green indicating Path Creator has all the data that it needs to make our paths for us. Before creating your path you may use either of the arrows at the bottom of the display to scroll back and forth to check over your work. |
||||
|
|
|
|
|
|
|
|
|
|
|
|
|
When selecting the option to Create my path! Path Creator will create a copy of its progress along with a log file in a transitional folder and then ask if you want to continue the progress of your project by installing it. These transitional folders come with Path Creator. Transitional paths are created inside the folder called My Paths while transitional queues are created inside the folder called My Queues. Each time you create your path or queue the contents of these transitional folders are updated with your latest creation along with the progress log file. |
||||
|
|
|
|
|
|
|
If you’d like to keep track of your progress by way of your log files it would be helpful to give each update of your projects a new number as you go along so that your log files aren’t constantly overwriting themselves. That way each of your path & queue iterations will have its own folder & log. You may give your iterations simple names, for example: |
||||
|
|
|
|
|
|
|
|
► |
Concrete Paths 01 |
||
|
|
► |
Concrete Paths 02 |
||
|
|
► |
Concrete Paths 03 |
||
|
|
|
|
|
|
|
You may choose which folder to install your paths & queues into by making the required changes in the utility with the Settings>Program Settings tab. |
||||
|
|
|
|
|
|
|
Microsoft Windows will overwrite older files with newer files at our request, but will merge the entire contents of newer folders into older folders. In view of this installing paths and queues directly into RCT3’s Program Files folder is not recommended. If you really want to install directly to RCT3’s Program Files folder you’ll need to run Path Creator as an Administrator, and remember each time to delete your older folders prior to installing your new content. |
||||
|
|
|
|
|
|
|
After you’ve completed entering all the details for your project, occasionally Path Creator will crash during the Create my path! process. It is recommended to save your project before creating your path. This way, should the utility crash while creating you can simply re- |
||||
|
|
|
|
|
|
|
|
|
|
|
|
|
When this utility is launched there is a viewer to the left side in which are listed previously saved projects. |
||||
|
|
|
|
|
|
|
Unfortunately the list doesn’t scroll, doesn’t always include the most recent projects, and will only ever list seven projects. It’s more convenient to get into the habit of clicking on File>Open Project on the top menu, browsing to, and opening your project in that way. If you’d like to clear the projects listed in this display you can do this through the settings tab. |
||||
|
|
|
|
|
|
|
Occasionally when saving our files the Save function does not actually save our project although we’ll receive a pop- |
||||
|
|
|
|
|
|
|
If you’ve organized and tidied your Path Creator related files and after that have re- |
||||
|
|
|
|
|
|
|
|
|
|
|
|
|
|
||||
|
|
|
|||
|
|
The maximum size for loading textures directly into Path Creator is 512 x 512. Although technically it is possible to create a path or queue set with larger textures than this, Path Creator will clip 1024 x 1024 textures when creating your path or queue. This will result in paths and queues on your terrain that are missing half of your ground- |
|||
|
|
|
|||
|
|
For gamers who’d like borders on their ground level paths and queues we’ve included two sets of templates with our download that suggests where you’d put the borders on your texture maps so they appear as they should in your park. The download link for the templates is at the end of this article. |
|||
|
|
|
|||
|
|
||||
|
|
|
|||
|
|
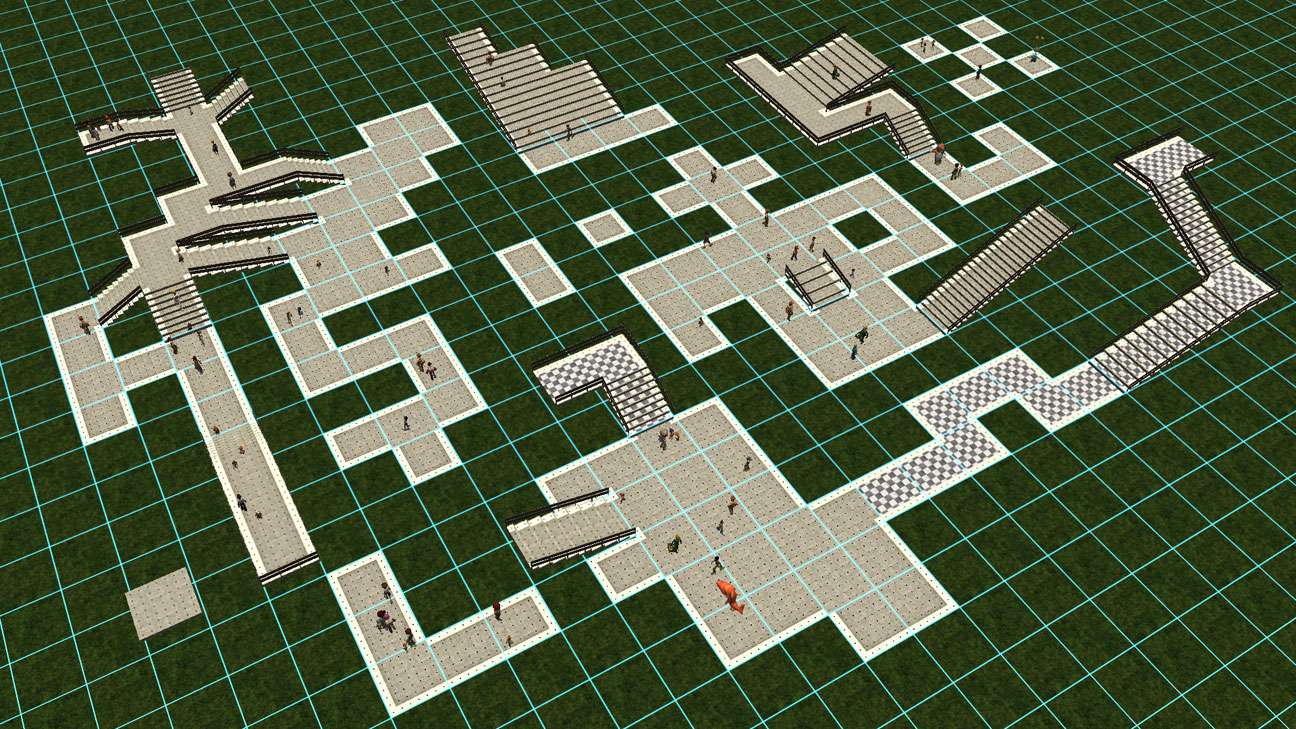
It is possible, without trimming down your path textures with any templates, to create full- |
|||
|
|
|
|
|
|
|
|
|
|||
|
|
|
|
|
|
|
|
||||
|
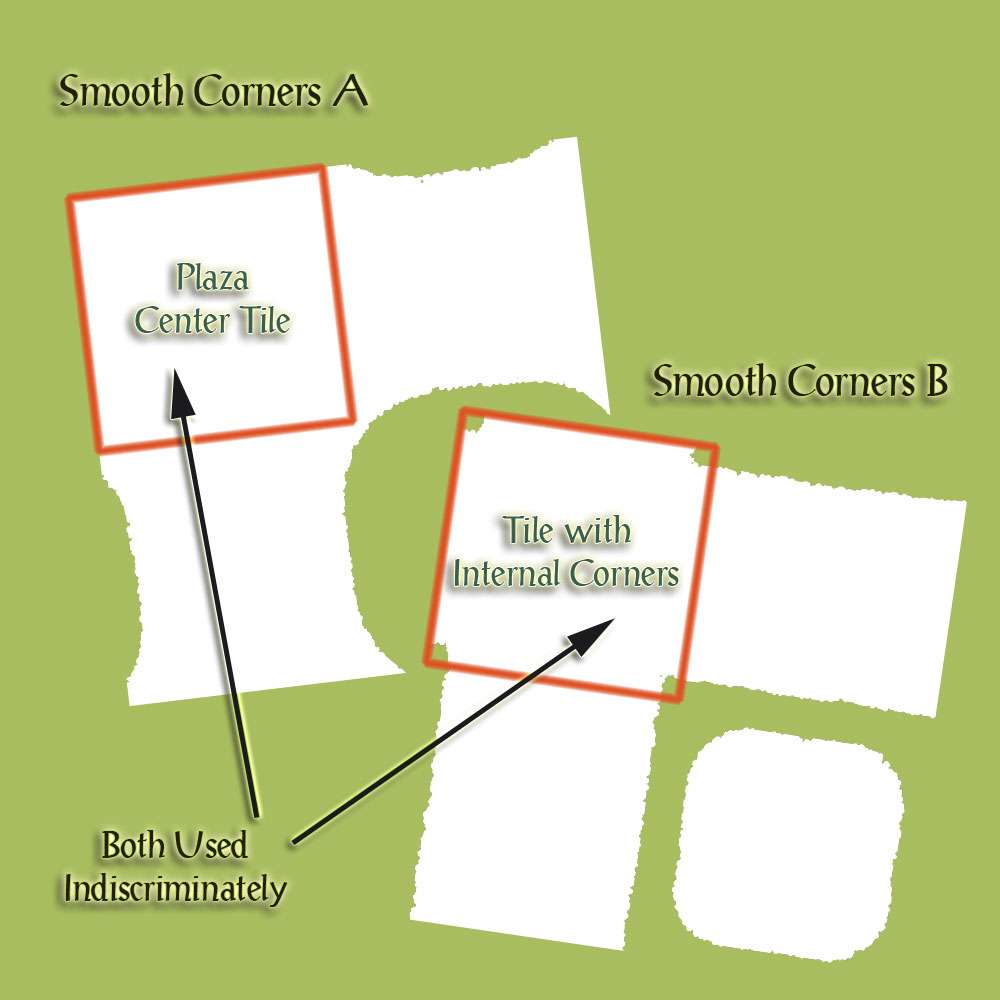
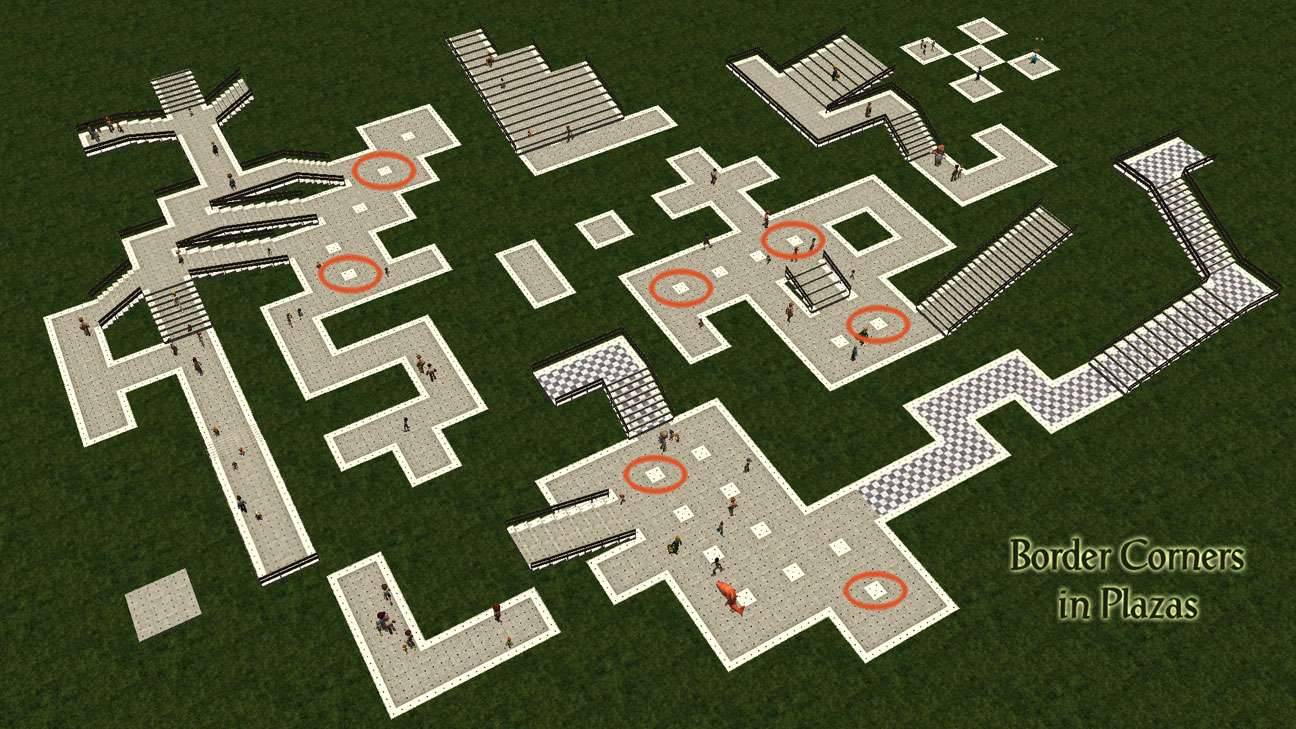
Unfortunately this comes with several sets of problems the first being that the game developers seem to have used the single inner corner texture and the plaza center tile texture indiscriminately. I’ve illustrated what I mean here with DarkHorizon’s templates: |
||||
|
|
|
|
|
|
|
|
|
|||
|
The result of this is that our plazas will either be filled with groupings of corners … |
||||
|
|
|
|
|
|
|
|
|
|||
|
|
|
|
|
|
|
|
||||
|
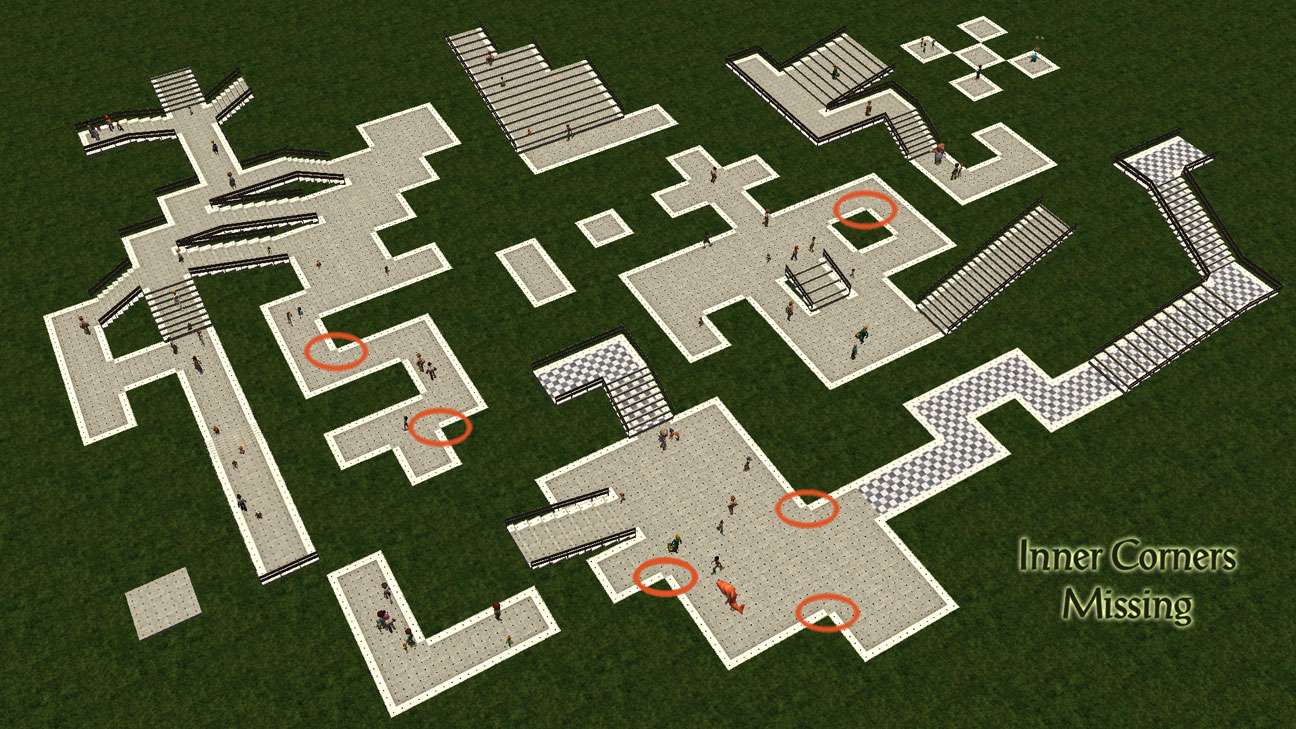
… or our border inner corners will be missing because there’ll be a plaza tile in place there instead of a tile with an inner corner. |
||||
|
|
|
|
|
|
|
|
|
|||
|
|
|
|
|
|
|
|
||||
|
It would seem that the one place where the developers have gotten the inner border corners spot on is at the bottoms of stairs. |
||||


|
|
|
|
|
|
|
Drag the above toggle by its edges to a convenient place on your screen. |
|
|
|
|
The Compleat Path Creator
| Viewing Full-Sized Images On This Website |
| Effective Park Design: The Best Start For Your Park, Page 2 |
| Master Maps And Guest AI, Page 2 |
| Guest Generation, Park Capacity, And Peep Factory, Page 2 |
| Setting Up And Switching Your Park Entrance, Page 2 |
| Theming Our Stalls & Facilities, Page 2 |
| Our VIP Blue Book, Page 2 |
| Our VIP Blue Book, Page 3 |
| Our VIP Blue Book, Page 4: Spot The VIP's |
| Volitionist's RCT3 Animal Care Guide, Page 2 |
| Volitionist's RCT3 Animal Care Guide, Page 3 |
| Volitionist's RCT3 Animal Care Guide, Page 4 |
| How To Unlock All Campaign Scenarios, Page 2 |
| The Care And Feeding of Custom Downloads, Page 2 |
| The Care And Feeding of Custom Downloads, Page 3 |
| The Care And Feeding of Custom Downloads, Page 4 |
| RCT3 Cheats & Unlockables, Page 2 |
| Options.txt Flags, Page 2 |
| Options.txt Flags, Page 3 |
| RCT3 Keyboard & Mouse Controls: Advanced |
| RCT3 Keyboard & Mouse Controls: Freelook |
| RCT3 Keyboard & Mouse Controls: Isometric |
| RCT3 Keyboard & Mouse Controls: Normal |
| Guests Departing The Station But Not Returning |
| Guests Knocked Over |
| People Spilling Down Stairs |
| Lost Staff |
| ReAppearing Invisible Vendors |
| Park File Thumbnails |
| RCT3 Freezes |
| Earthquakes and Plumbing |
| The Importer |
| SketchUp |
| Reviewing RCT3’s History, Page 2 |
| Chris Sawyer, Page 2 |
| Showcase!: Fall 2020, TNS Pool Paths & TNS Pool Terrain, Page 2 |
| Showcase!: Fall 2020, TNS Pool Paths & TNS Pool Terrain, Page 3 |
| Showcase!: Fall 2020, TNS Pool Paths & TNS Pool Terrain, Page 4 |
| Showcase: Spring 2019 - DasMatze's Fences & Railings, Page 2 |
| Showcase: Spring 2019 - DasMatze's Fences & Railings, Page 3 |
| Showcase: Spring 2019 - DasMatze's Fences & Railings, Page 4 |
| Showcase: Fall 2018 - L-33/Lee, Page 2 |
| Showcase: Fall 2018 - L-33/Lee, Page 3 |
| Showcase: Fall 2018 - L-33/Lee, Page 4 |
| Showcase: Spring 2018 - Spez Mies Wall Set, Page 2 |
| Showcase: Winter 2017 - Mr. Sion's Tiki Bar, Page 2 |
| Showcase: Fall 2017 - Polynesian Panic, Page 2 |
| Hall of Fame: Belgabor's Invisible Doodads |
| Hall of Fame: Spice's Invisible Pool CS |
| Hall of Fame: GTT's Hedge Maze |
| Hall of Fame: GTT's Glas Labyrinth |
| Hall of Fame: Joey's Park CleanUp |
| Hall of Fame: GTT's Hedge Maze, Page 2 |
| My Adventures In SketchUp |
| CSO's I Have Imported |
| TexMod Customized Add-Ins |
| My Parks |
| Videos |
| Screenshots |
| Advertisement Land |
| Intrepid: A Revolution In Design |
| Structure And Ride Supports Set |
| CSO Study: GTT’s Hedge Maze |
| Wonderland Themed Playing Card Railings |
| Architectural Chess |
| Mini Chess |
| Planters 'n' Fountains Set |
| Intrepid: A Revolution In Design, Page 2 |
| Intrepid: A Revolution In Design, Page 3 |
| Intrepid: A Revolution In Design, Page 4 |
| Structure And Ride Supports Set, Page 2 |
| Café, Update 1 |
| Path Add-Ons, Update 1 |
| Planters And Pool Fencing, Page 2 |
| Landscaping And Park Grounds, Page 2 |
| Walls, Tunnels, And Fences, Page 2 |
| Decking, Stairs, And Balustrades Set, Page 2 |
| Decking, Stairs, And Balustrades Set, Page 3 |
| CFR & CTR CSO's, Page 2 |
| CFR & CTR CSO's, Page 3 |
| CFR & CTR CSO's, Update 1, Page 1 |
| CFR & CTR CSO's, Update 1, Page 2 |
| TexMod Tutorial |
| My TexMod Skies |
| TexMod MakeOvers For My Park |
| TexMod MakeOvers For My Park, Page 2 |
| Vanguard West |
| Vanguard West: Financial Report |
| Hillside On The Lake |
| Hillside On The Lake: Financial Summary |
| A Woodland Clearing |
| Vanguard West, Page 2 |
| Vanguard West, Page 3 |
| Vanguard West, Page 4 |
| Vanguard West, Page 5 |
| Vanguard West, Page 6 |
| Vanguard West: Financial Report, Page 2 |
| Vanguard West: Financial Report, Page 3 |
| Hillside On The Lake, Page 2 |
| Hillside On The Lake, Page 3 |
| Hillside On The Lake, Page 4 |
| Hillside On The Lake, Page 5 |
| Hillside On The Lake, Page 6 |
| Hillside On The Lake: Financial Summary, Page 2 |
| Hillside On The Lake: Financial Summary, Page 3 |
| Hillside On The Lake: Financial Summary, Page 4 |
| Hillside On The Lake: Financial Summary, Page 5 |
| A Woodland Clearing, Page 2 |
| Screenshots, Page 2 |
| Screenshots, Page 3 |
| Screenshots, Page 4 |
| Screenshots, Page 5 |
| Advertisement Land, Page 2 |
| Collaborations - Custom Content |
| Collaborations - Parks |
| L-33's POE Building 4 Set |
| RCT2 Wonderland Themed CSO's |
| The Crüe |
| L-33's POE Building 4 Set, Page 2 |
| RCT2 Wonderland Themed CSO's, Page 2 |
| POE Building 4 Set Presentation Park |
| POE Building 4 Set Presentation Park, Page 2 |
| POE Building 4 Set Presentation Park, Page 3 |
| POE Building 4 Set Presentation Park, Page 4 |
| POE Building 4 Set Presentation Park, Page 5 |
| How To Use Park CleanUp, Page 2 |
| How To Use Park CleanUp, Page 3 |
| Park Admission, Ride Pricing, And EI&N, Page 2 |
| Maximizing Your Small Park's Real Estate, Page 2 |
| Park Shuttle Configurations, Page 2 |
| Elevated Coaster Stations And Access Options, Page 2 |
| Suspended Pools And Guest Access Options, Page 2 |
| Terrain Painting - Artistry In Landscaping, Page 2 |
| Terrain Painting - Artistry In Landscaping, Page 3 |
| How To Build A Great Park, Page 2 |
| Optimize Your System And Enhance Your Gaming Experience, Page 2 |
| Custom Scenery |
| TexMod ReTexture Packs |
| Miscellaneous |
| Parks, Scenarios, & Sandboxes |
| Coasters, Rides, & Attractions |
| Structure And Ride Supports - Original Concrete |
| Structure And Ride Supports - Hewn Brick |
| RCT2 Wonderland Themed Set |
| RCT2 Revival Crüe Chess |
| FTA's Invisible Stall With Invisible Vendor |
| RCT3 Launch Screen Slideshow Template |
| Dark Ride Enclosure Toppers |
