
This website views at its very best in Firefox web browser, and is not available in a mobile version.
Copyright © All Rights Reserved | Built by Serif Templates


|
Introduction |
||||
|
|
|
|
|
|
|
VIP’s first arrived on the RollerCoaster Tycoon scene in RCT3 Vanilla and are referred to as VIPeeps in the RCT3 instruction manual. They’re known as celebrities throughout our wider community. |
||||
|
|
|
|
|
|
|
|
||||
|
They’re a unique group of distinguished guests that often appear in Campaign scenario parks as part of that scenario’s mission objective. VIP’s don’t ordinarily attend sandbox parks although it’s possible to have Kara Oki in your sandbox park if you add her concert flat ride there. However, one can choose to have VIP’s in any park they’ve designed provided they create their park as a scenario. VIP’s won’t simply attend your park but will need to be invited as you set up the scenario. You’ll do that by including them in either the scenario’s objectives or in its challenges. At the end of the next page in this article we show you how to select and set up your VIP. You will find that each can be given his own set of requirements, demands, and needs. |
||||
|
|
|
|
|
|
|
There are a total of six VIP’s. The first four VIP’s: |
||||
|
|
|
|
|
|
|
|
► |
Clint Bushton, |
||
|
|
► |
Cami O, |
||
|
|
► |
Kara Oki, and |
||
|
|
► |
Joe Sluggerball |
||
|
|
|
|
|
|
|
were specifically introduced to us with RCT3 Vanilla. |
||||
|
|
|
|
|
|
|
|
► |
Bob Waterman, |
||
|
|
|
|
|
|
|
the Soaked! VIP, came with the Soaked! expansion as one of that expansion’s surprise gaming elements waiting to be uncovered by gamers. |
||||
|
|
|
|
|
|
|
|
► |
Major Smythe, |
||
|
|
|
|
|
|
|
the Wild! VIP also arrived as a gaming element in the Wild! expansion. |
||||
|
|
|
|
|
|
|
As of the Soaked! expansion all VIP’s come with swimsuits, some come with inflatables, and all can swim in our pools. |
||||
|
|
|
|
|
|
|
|
||||
|
When a Scenario Campaign Objective requires that you host a VIP, you need to follow specific steps in order to accomplish the mission objective. At the beginning of each scenario you should pause the game and read the objectives regarding the VIP. Beneath the celebrity’s name you will see his arrival date and expectations. It will also be helpful if at the start of each scenario you look over the requirements for each of the Apprentice, Entrepreneur, and Tycoon levels which usually provide valuable information as to how you should start building and developing your park in order to meet any objectives, and possibly preparing the mission for your celebrity. |
||||
|
|
|
|
|
|
|
Setting Up Your VIP’s Route |
||||
|
|
|
|
|
|
|
Through the use of waypoints VIP’s can be directed to any tracks, rides, and attractions although it’s usually best to restrict their travels throughout your park as specifically listed in the scenario objectives. This will minimize something going wrong outside their scenario requirements which may result in your VIP leaving the park dissatisfied, and in your not completing that scenario mission until the next time that VIP visits your park. |
||||
|
|
|
|
|
|
|
We’ve created a VIP Fun Park in which one can practice with VIP’s without the pressures or constraints of a Campaign scenario and we’ve used that park in this demonstration on how to set up our route for the VIP. |
||||
|
|
|
|
|
|
|
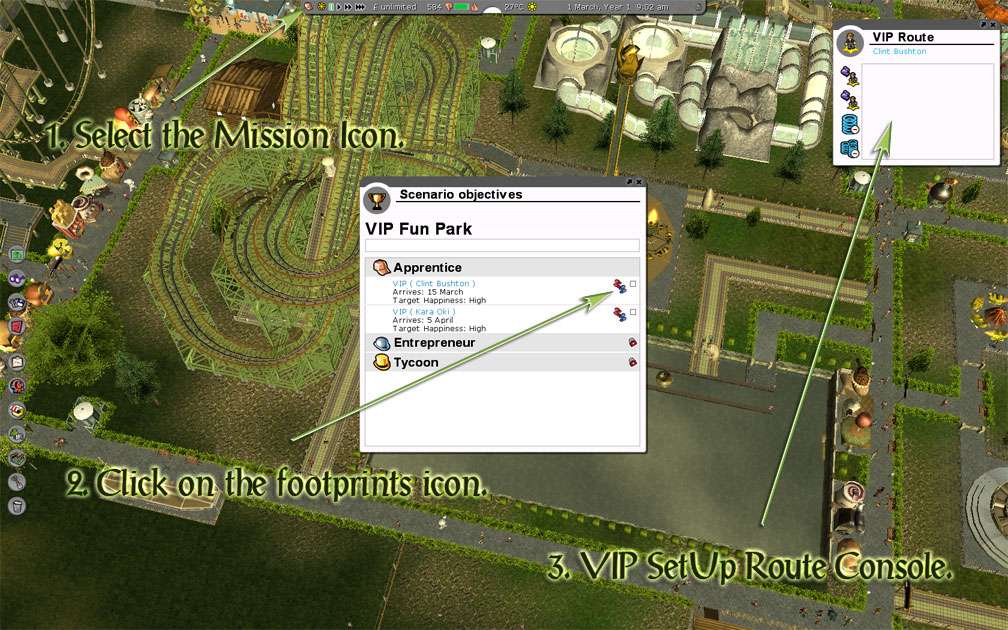
The best time to set up your VIP’s waypoints is before his arrival. After you’ve opened the park the first thing to do is to go to the dashboard at the top of your display. At the left is the mission icon, in this case, the Apprentice icon. Click on that and you’ll open the scenario console. Click on the footprints icon there to activate the Setup Route console which will appear at the top right. |
||||
|
|
|
|
|
|
|
|
||||
|
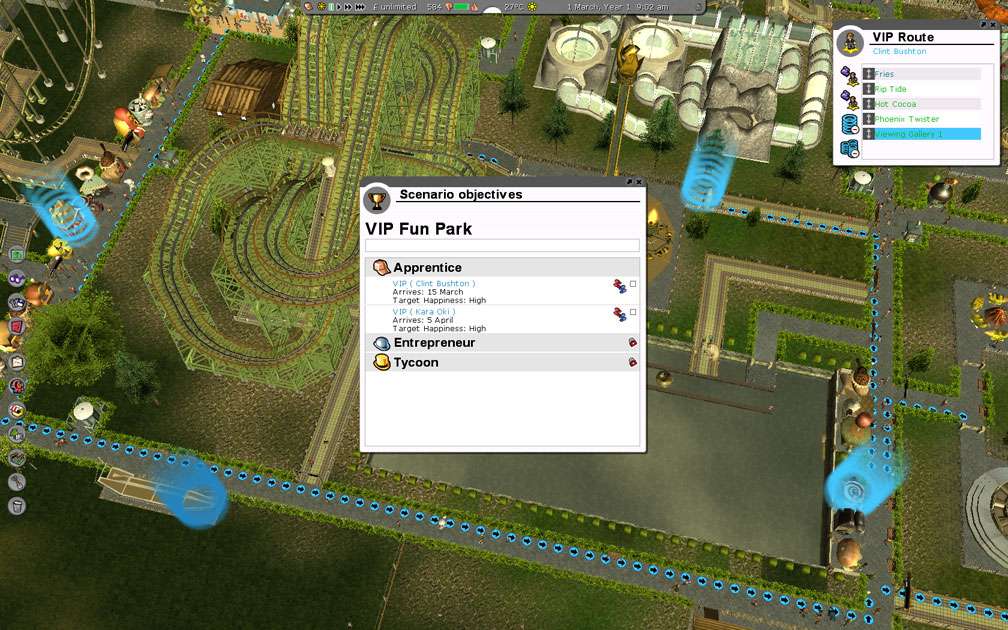
Then click on the attractions throughout your park in the order that you want them visited. The celebrity’s route will be clearly marked with a footprint pattern in blue circles & pulsating placement circles. In the following image you will see we’ve begun our celebrity’s itinerary with the fries stall at the top left, and have finished with Phoenix Twister at the top right. |
||||
|
|
|
|
|
|
|
|
||||
|
Note the list of waypoints now on display in the SetUp Route console. A waypoint was created in each place where we clicked when we set up the route. The Setup Route dialog will confirm in text if we’ve clicked on the correct item or if we’ve clicked on something irrelevant. |
||||
|
|
|
|
|
|
|
VIP Routes, The Finer Points |
||||
|
|
|
|
|
|
|
If you want your celebrity to take a particular direction or to stop at certain points along the route you may click on any of the path tiles and any scenery items in order to get him to travel in that direction. While it’s convenient to direct your VIP about your park by adding the stalls, facilities and toilets to the VIP’s itinerary you will find the VIP’s won’t use them, they’ll simply stop nearby and continue on towards their next waypoint. |
||||
|
|
|
|
|
|
|
During or after the VIP’s route has been set up you may add to, remove, or reorder his waypoints by using the controls in the VIP’s Setup Route dialog box. If you happen to be building your park at the same time you're setting up your VIP's itinerary, any rides that are later deleted which have already added as a waypoint will be removed from his itinerary |
||||
|
|
|
|
|
|
|
Here we’re going to take Viewing Gallery 1 and move it to the bottom of the list. To edit the itinerary we may select a waypoint and delete, or we can click to choose the waypoint, then drag to move … |
||||
|
|
|
|
|
|
|
|
||||
|
Take a moment to compare the VIP’s route along the park paths at the exit of Phoenix Twister (immediately above the Scenario Objectives dialog) and along the top left of the above and below images. |
||||
|
|
|
|
|
|
|
|
||||
|
By moving one of the waypoints we were easily able to alter the route taken by the VIP. This would be a good time to check the changes we’ve made. Observe that now the VIP’s route involves unnecessary walking about the park and would require less travel on his part if we next moved Fries so it is visited after Phoenix Twister. You might prefer another change to the VIP’s route than the ones in this demonstration. |
||||
|
|
|
|
|
|
|
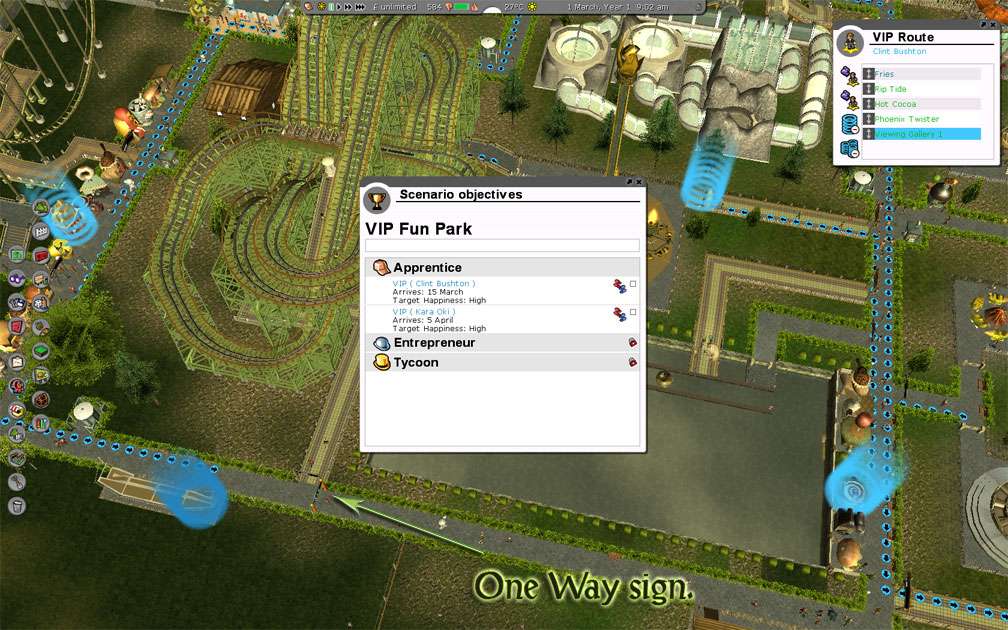
Just like our regular park guests VIP’s won’t walk through one way signs and no RCT3 person will cross broken paths (paths where the terrain edges don’t meet exactly). Here we’ve placed a one way sign on the path along bottom of the image after Viewing Gallery 1. |
||||
|
|
|
|
|
|
|
|
||||
|
As you see the route’s completely altered, now up off the top of the image, around behind aquarium, and along by the pool complex changing rooms. If we had no alternative way around the park the blue footprint circles would not have changed position and we’d have seen that one area of the VIP’s route travelling through the One Way sign without the round footprint circles. To demonstrate, this next image shows where we’ve deleted path tiles to remove any alternative way around. |
||||
|
|
|
|
|
|
|
|
||||
|
With the one way sign and without any alternate route, the footprint circles are missing showing that there is no route in between the affected pulsating circles. |
||||
|
|
|
|
|
|
|
To properly set your waypoints, if you want your VIP to visit a flat ride or a coaster be sure you click on the track, on the ride, or on the entrance booth, and not on the queue leading up to the attraction. If your VIP wants to see fireworks or a themed area you need only to place his route along the path nearest your display. Click on any changing room to get your VIP to use that pool. |
||||
|
|
|
|
|
|
|
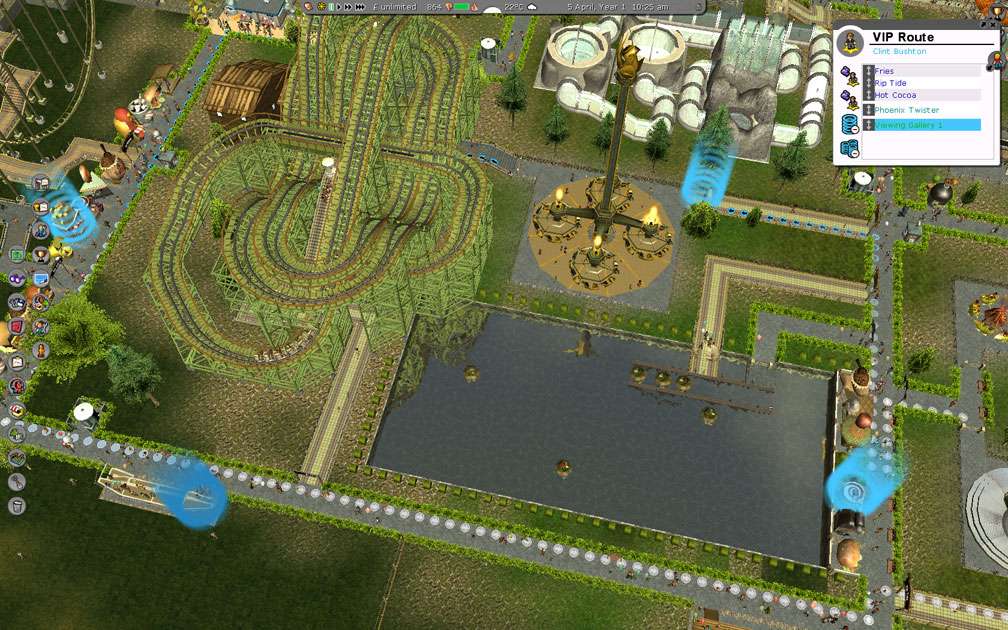
After your celebrity's visited his waypoints the blue footprint circles will lighten to white circles on areas of the VIP’s route. To reflect this the text will also display a different color in the SetUp Route dialog, showing dark blue text for visited waypoints, and a lighter blue text for waypoints yet to be seen. |
||||
|
|
|
|
|
|
|
|
||||
|
Although they will pay for any rides taken, unlike our park guests VIP's are not concerned about the prices we charge for our attractions and will happily board our rides regardless of the cost. When VIP’s visit an attraction guests already waiting in that queue will obligingly stop boarding the ride. This will enable your VIP to embark promptly, something he will do by walking through all the guests who are waiting. The exception would be queues to water rides & slides where the VIP will wait his turn there in the queue along with your other park guests. |
||||
|
|
|
|
|
|
|
When male and female VIP's enter the queue at the same time all will hurry to the ride's entrance but the male VIP's almost always wait for the female VIP's to board first. However, once on the ride platform they sometimes rush past the females to hurry into their ride car. |
||||

| Viewing Full-Sized Images On This Website |
| Effective Park Design: The Best Start For Your Park, Page 2 |
| Master Maps And Guest AI, Page 2 |
| Guest Generation, Park Capacity, And Peep Factory, Page 2 |
| Setting Up And Switching Your Park Entrance, Page 2 |
| Theming Our Stalls & Facilities, Page 2 |
| Our VIP Blue Book, Page 2 |
| Our VIP Blue Book, Page 3 |
| Our VIP Blue Book, Page 4: Spot The VIP's |
| Volitionist's RCT3 Animal Care Guide, Page 2 |
| Volitionist's RCT3 Animal Care Guide, Page 3 |
| Volitionist's RCT3 Animal Care Guide, Page 4 |
| How To Unlock All Campaign Scenarios, Page 2 |
| The Care And Feeding of Custom Downloads, Page 2 |
| The Care And Feeding of Custom Downloads, Page 3 |
| The Care And Feeding of Custom Downloads, Page 4 |
| RCT3 Cheats & Unlockables, Page 2 |
| Options.txt Flags, Page 2 |
| Options.txt Flags, Page 3 |
| RCT3 Keyboard & Mouse Controls: Advanced |
| RCT3 Keyboard & Mouse Controls: Freelook |
| RCT3 Keyboard & Mouse Controls: Isometric |
| RCT3 Keyboard & Mouse Controls: Normal |
| Guests Departing The Station But Not Returning |
| Guests Knocked Over |
| People Spilling Down Stairs |
| Lost Staff |
| ReAppearing Invisible Vendors |
| Park File Thumbnails |
| RCT3 Freezes |
| Earthquakes and Plumbing |
| The Importer |
| SketchUp |
| Reviewing RCT3’s History, Page 2 |
| Chris Sawyer, Page 2 |
| Showcase!: Fall 2020, TNS Pool Paths & TNS Pool Terrain, Page 2 |
| Showcase!: Fall 2020, TNS Pool Paths & TNS Pool Terrain, Page 3 |
| Showcase!: Fall 2020, TNS Pool Paths & TNS Pool Terrain, Page 4 |
| Showcase: Spring 2019 - DasMatze's Fences & Railings, Page 2 |
| Showcase: Spring 2019 - DasMatze's Fences & Railings, Page 3 |
| Showcase: Spring 2019 - DasMatze's Fences & Railings, Page 4 |
| Showcase: Fall 2018 - L-33/Lee, Page 2 |
| Showcase: Fall 2018 - L-33/Lee, Page 3 |
| Showcase: Fall 2018 - L-33/Lee, Page 4 |
| Showcase: Spring 2018 - Spez Mies Wall Set, Page 2 |
| Showcase: Winter 2017 - Mr. Sion's Tiki Bar, Page 2 |
| Showcase: Fall 2017 - Polynesian Panic, Page 2 |
| Hall of Fame: Belgabor's Invisible Doodads |
| Hall of Fame: Spice's Invisible Pool CS |
| Hall of Fame: GTT's Hedge Maze |
| Hall of Fame: GTT's Glas Labyrinth |
| Hall of Fame: Joey's Park CleanUp |
| Hall of Fame: GTT's Hedge Maze, Page 2 |
| My Adventures In SketchUp |
| CSO's I Have Imported |
| TexMod Customized Add-Ins |
| My Parks |
| Videos |
| Screenshots |
| Advertisement Land |
| Intrepid: A Revolution In Design |
| Structure And Ride Supports Set |
| CSO Study: GTT’s Hedge Maze |
| Wonderland Themed Playing Card Railings |
| Architectural Chess |
| Mini Chess |
| Planters 'n' Fountains Set |
| Intrepid: A Revolution In Design, Page 2 |
| Intrepid: A Revolution In Design, Page 3 |
| Intrepid: A Revolution In Design, Page 4 |
| Structure And Ride Supports Set, Page 2 |
| Café, Update 1 |
| Path Add-Ons, Update 1 |
| Planters And Pool Fencing, Page 2 |
| Landscaping And Park Grounds, Page 2 |
| Walls, Tunnels, And Fences, Page 2 |
| Decking, Stairs, And Balustrades Set, Page 2 |
| Decking, Stairs, And Balustrades Set, Page 3 |
| CFR & CTR CSO's, Page 2 |
| CFR & CTR CSO's, Page 3 |
| CFR & CTR CSO's, Update 1, Page 1 |
| CFR & CTR CSO's, Update 1, Page 2 |
| TexMod Tutorial |
| My TexMod Skies |
| TexMod MakeOvers For My Park |
| TexMod MakeOvers For My Park, Page 2 |
| Vanguard West |
| Vanguard West: Financial Report |
| Hillside On The Lake |
| Hillside On The Lake: Financial Summary |
| A Woodland Clearing |
| Vanguard West, Page 2 |
| Vanguard West, Page 3 |
| Vanguard West, Page 4 |
| Vanguard West, Page 5 |
| Vanguard West, Page 6 |
| Vanguard West: Financial Report, Page 2 |
| Vanguard West: Financial Report, Page 3 |
| Hillside On The Lake, Page 2 |
| Hillside On The Lake, Page 3 |
| Hillside On The Lake, Page 4 |
| Hillside On The Lake, Page 5 |
| Hillside On The Lake, Page 6 |
| Hillside On The Lake: Financial Summary, Page 2 |
| Hillside On The Lake: Financial Summary, Page 3 |
| Hillside On The Lake: Financial Summary, Page 4 |
| Hillside On The Lake: Financial Summary, Page 5 |
| A Woodland Clearing, Page 2 |
| Screenshots, Page 2 |
| Screenshots, Page 3 |
| Screenshots, Page 4 |
| Screenshots, Page 5 |
| Advertisement Land, Page 2 |
| Collaborations - Custom Content |
| Collaborations - Parks |
| L-33's POE Building 4 Set |
| RCT2 Wonderland Themed CSO's |
| The Crüe |
| L-33's POE Building 4 Set, Page 2 |
| RCT2 Wonderland Themed CSO's, Page 2 |
| POE Building 4 Set Presentation Park |
| POE Building 4 Set Presentation Park, Page 2 |
| POE Building 4 Set Presentation Park, Page 3 |
| POE Building 4 Set Presentation Park, Page 4 |
| POE Building 4 Set Presentation Park, Page 5 |
| How To Use Park CleanUp, Page 2 |
| How To Use Park CleanUp, Page 3 |
| Park Admission, Ride Pricing, And EI&N, Page 2 |
| Maximizing Your Small Park's Real Estate, Page 2 |
| Park Shuttle Configurations, Page 2 |
| Elevated Coaster Stations And Access Options, Page 2 |
| Suspended Pools And Guest Access Options, Page 2 |
| Terrain Painting - Artistry In Landscaping, Page 2 |
| Terrain Painting - Artistry In Landscaping, Page 3 |
| How To Build A Great Park, Page 2 |
| Optimize Your System And Enhance Your Gaming Experience, Page 2 |
| Custom Scenery |
| TexMod ReTexture Packs |
| Miscellaneous |
| Parks, Scenarios, & Sandboxes |
| Coasters, Rides, & Attractions |
| Structure And Ride Supports - Original Concrete |
| Structure And Ride Supports - Hewn Brick |
| RCT2 Wonderland Themed Set |
| RCT2 Revival Crüe Chess |
| FTA's Invisible Stall With Invisible Vendor |
| RCT3 Launch Screen Slideshow Template |
| Dark Ride Enclosure Toppers |
| Effective Park Design: The Best Start For Your Park, Page 2 |
| Master Maps And Guest AI, Page 2 |
| Guest Generation, Park Capacity, And Peep Factory, Page 2 |
| Setting Up And Switching Your Park Entrance, Page 2 |
| Theming Our Stalls & Facilities, Page 2 |
| Our VIP Blue Book, Page 2 |
| Our VIP Blue Book, Page 3 |
| Our VIP Blue Book, Page 4: Spot The VIP's |
| Volitionist's RCT3 Animal Care Guide, Page 2 |
| Volitionist's RCT3 Animal Care Guide, Page 3 |
| Volitionist's RCT3 Animal Care Guide, Page 4 |
| How To Unlock All Campaign Scenarios, Page 2 |
| The Care And Feeding of Custom Downloads, Page 2 |
| The Care And Feeding of Custom Downloads, Page 3 |
| The Care And Feeding of Custom Downloads, Page 4 |
| RCT3 Cheats & Unlockables, Page 2 |
| Options.txt Flags, Page 2 |
| Options.txt Flags, Page 3 |
| RCT3 Keyboard & Mouse Controls: Advanced |
| RCT3 Keyboard & Mouse Controls: Freelook |
| RCT3 Keyboard & Mouse Controls: Isometric |
| RCT3 Keyboard & Mouse Controls: Normal |
| Guests Departing The Station But Not Returning |
| Guests Knocked Over |
| People Spilling Down Stairs |
| Lost Staff |
| ReAppearing Invisible Vendors |
| Park File Thumbnails |
| RCT3 Freezes |
| Earthquakes and Plumbing |
| The Importer |
| SketchUp |
| Reviewing RCT3’s History, Page 2 |
| Chris Sawyer, Page 2 |


