

This website views at its very best in Firefox web browser, and is not available in a mobile version.
Copyright © All Rights Reserved | Built by Serif Templates


|
|
|
|
|
|
|
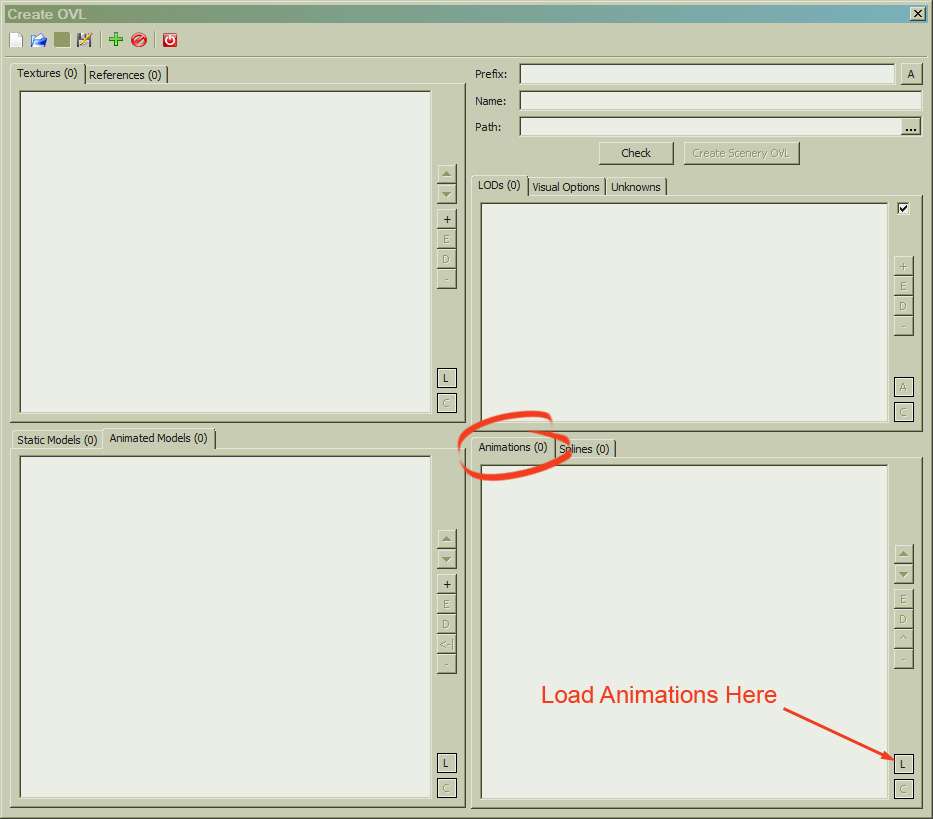
While Importing your car model you'll need to know where to load your XML's. This next screenshot, with all the fields completely blank for clarity, shows where. |
||||
|
|
|
|
|
|
|
|
||||
|
Once you mouse click on the Load toggle you'll be able to browse to your XML's and load them into the Importer in this way. Animations load one at a time and you'll need to browse each time to add all four of them. |
||||
|
|
|
|
|
|
|
|
||||
|
There's one final step that needs to be taken and that's to orientate our XML's. That can be done here by double clicking on each animation and adjusting the Coordinates System setting to match SketchUp which is Right- |
||||
|
|
|
|
|
|
|
|
||||
|
|
|
|
|
|
|
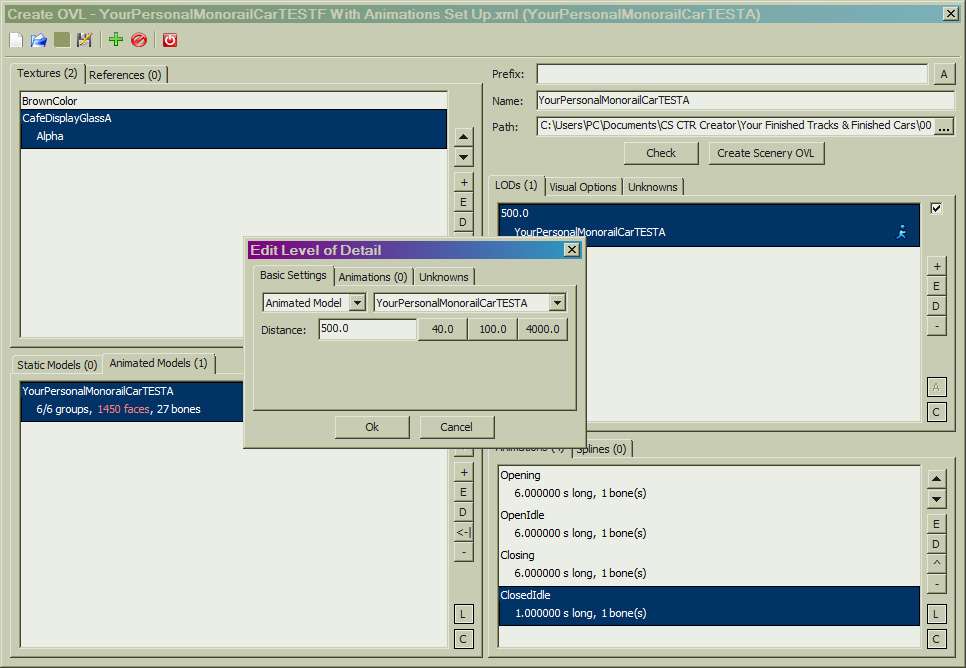
Properly assigning LOD's to our car requires that we go to the Animated Models dialog and create two copies of our model. This will give us the required three to set up one each with the 40.0 LOD, another for the 100.0 LOD, and the third copy for the 4000 LOD. Early on during our car's development at the time we're going to be making lots of edits we don't want to be giving our car precise levels of LOD's as if it's a completed design so for now we'll settle on a single level of detail. 500.0 is a good value for temporary use. Just ignore for now any messages from the Importer that three LOD's are required. |
||||
|
|
|
|
|
|
|
Temporarily assigning LOD's to our car may be done by going to the LOD's dialog in the Importer, clicking on the + to add a single level of detail, entering 500.0 for this temporary LOD set- |
||||
|
|
|
|
|
|
|
|
||||
|
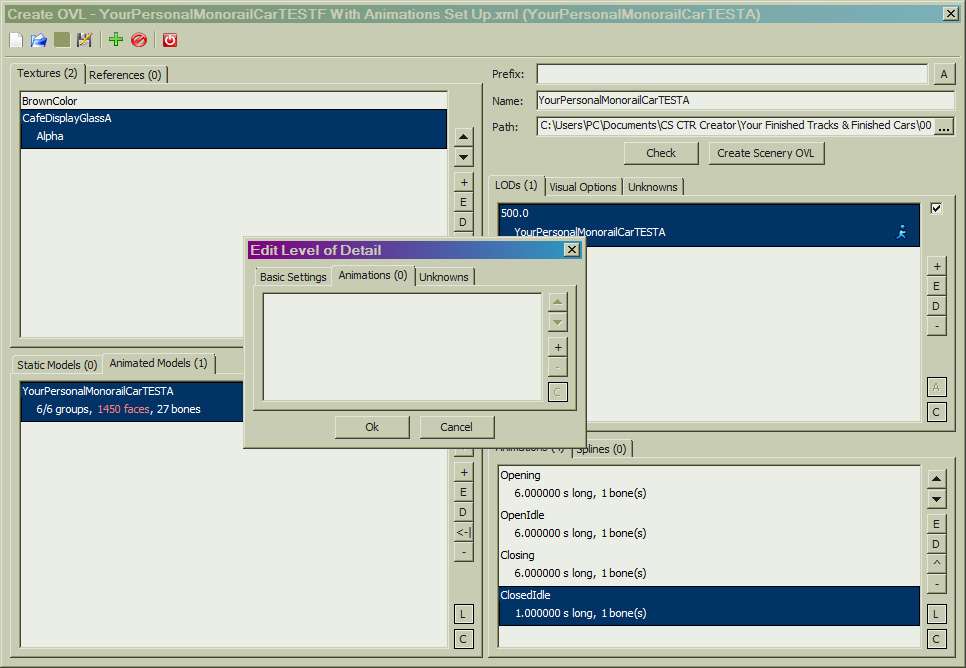
Click on the second tab, Animations. |
||||
|
|
|
|
|
|
|
|
||||
|
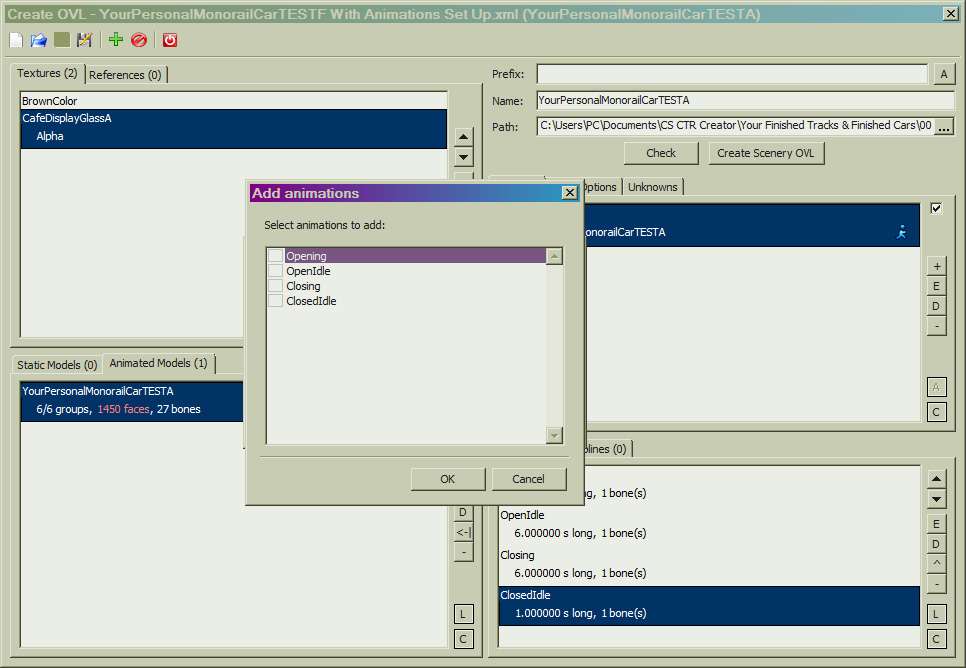
Now click on the +. Our animations may be added in this way. All the boxes may be ticked in one go. |
||||
|
|
|
|
|
|
|
|
||||
|
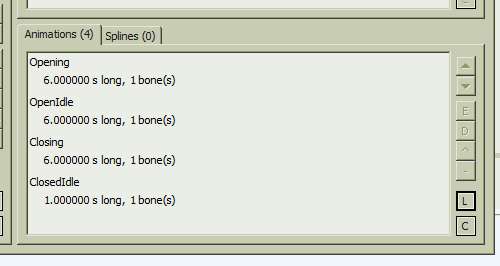
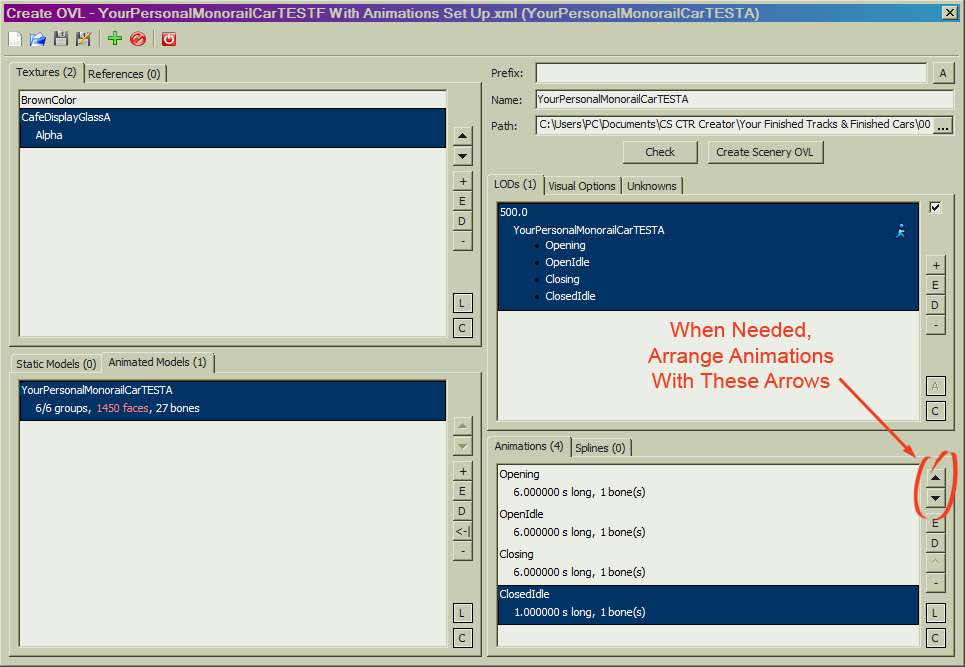
Ensure that your animations are arranged here in the same sequence as they're arranged below in the Animations window. |
||||
|
|
|
|
|
|
|
|
||||
|
If for any reason you're not happy with your animations at this time, e.g., the times don't look like they should, you can update your animation XML's after which they'll need to be re- |
||||
|
|
|
|
|
|
|
|
|
|
|
|
|
In the Advanced version of WagenDaten_ templates, at the bottom of the list for each car type are the fields in which we need to enter values so the animation we've so carefully created is actually played with that car type in the game. There are three sets of Animation fields. Each field is named: |
||||
|
|
|
|
|
|
|
|
► |
restraint, |
||
|
|
► |
door, and |
||
|
|
► |
feature. |
||
|
|
|
|
|
|
|
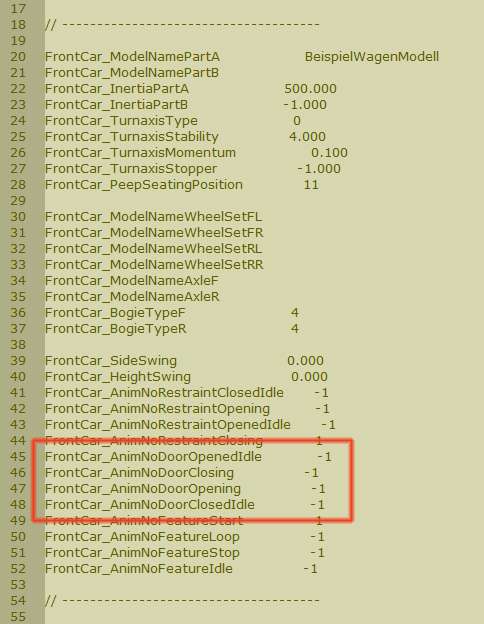
This is why it's necessary to name your bone with one of these three words in it, so that it's possible to choose specific fields in the WagenDaten_ to play the animation. The door Animation fields that we need are highlighted in the next WagenDaten_ template screenshot. |
||||
|
|
|
|
|
|
|
|
||||
|
You will note all the values are at - |
||||
|
|
|
|
|
|
|
|
||||
|
We're going to assign the following numbers to each of these animation values in our WagenDaten_ so they play in order: |
||||
|
|
|
|
|
|
|
|
► |
Opening - |
||
|
|
► |
OpenIdle - |
||
|
|
► |
Closing - |
||
|
|
► |
ClosedIdle - |
||
|
|
|
|
|
|
|
This is how these four lines should appear in our WagenDaten_ with each line given the correct numbers. |
||||
|
|
|
|
|
|
|
|
||||
|
If you haven't gotten CTR Creator to write your WagenDaten_ you may simply type it in as seen at the end of the FrontCar_ section. |
||||
|
|
|
|
|
|
|
The fields appear out of order in the WagenDaten_ but the important thing is that we number them in the correct sequence. This code should be typed into your WagenDaten_ in the same order in which it appears here. |
||||
|
|
|
|
|
|
|
The pride- |
||||
|
|
|
|
|
|
|
We only did one door in this session to keep things easier to follow. To get both doors animating at the same time we simply need to create additional animations, return to our model in the importer, and set things up so we have two animated doors on our car. When you do this do remember that the left door we animated moved 10cm in a - |
||||
|
|
|
|
|
|
|
XML CTR_OldSpicesTrain Door Animations will show you how to include several animations and several bones in the same XML file. |
||||
|
|
|
|
|
|
|
|
|
|
|
|
|
There are two times during which it’s best to test our animations. The first is early on in the design of our animated object where it may be tested in SketchUp (see our video here Testing Your Restraint's Rotation) with the Bone Effect and the Mesh in their exact starting places (not at X+Y+Z=0), after which we'd actually move and/or rotate the mesh ourselves to test the required positioning. Although there is animation software available for SketchUp one could set up a temporary rig and test the movements himself way sooner than learning the animating software and setting up the meshes and bones so they run as desired through the software. At one time EnigmaticEffigy had made available to the community a utility called Animatum into which one could transfer their XML and this utility would show how the model would work in the game without the need to launch RCT3. We’ve been unable to find that utility available anywhere to download. |
||||
|
|
|
|
|
|
|
Without Animatum, the only way to see our animation in operation without ourselves manipulating it in SketchUp is in RCT3. It's extremely helpful to identify the different stages of animation if guests are actually boarding the car as you observe your work. This is necessary because, with guests boarding the train it will be convenient to tell if any problem you've observed is, e.g., at the end of the Opening sequence, or at the start of the OpenIdle cycle. |
||||
|
|
|
|
|
|
|
|
|
|
|
|
|
This is pretty straight- |
||||
|
|
|
|
|
|
|
|
||||
|
After you've imported your updated animations and have returned to the game, ignore the first car leaving the station if your track is already testing or opened because that first car will probably have in it traces of the previous animation. The next car leaving the station gives a more accurate picture of your updates. If you're at all in doubt as to what effect your XML updates are having simply close the ride, open construction mode, close construction mode, and then again test or open the ride. |
||||
|
|
|
|
|
|
|
These animations are probably a bit long for regular use by most gamers. They're deliberately long so that you'll have time to fully observe the movements of your animation without being rushed through any of the cycles. After you've gotten this animation working for the first time make backup copies of your animation XML's and then create another set with shorter times. You may copy & paste the original set and simply edit the time differences into the copies. |
||||
|
|
|
|
|
|
|
|
||||
|
|
|
|
|
|
|
If for any reason you need to use a closing animation rather than an opening animation you'd use this sequence: |
||||
|
|
|
|
|
|
|
|
► |
Closing, |
||
|
|
► |
ClosedIdle, |
||
|
|
► |
Opening, and then |
||
|
|
► |
OpenIdle. |
||
|
|
|
|
|
|
|
Again, when Importing these animations they should be started and sequenced in the same exact order in the Importer's LOD dialog, the Importer's Animations dialog, and in the WagenDaten_ file. |
||||
|
|
|
|
|
|
|
Drag the above toggle to a convenient place on your screen. |
|
|
|
|
The Ultimate CTR Creator


| Viewing Full-Sized Images On This Website |
| Effective Park Design: The Best Start For Your Park, Page 2 |
| Master Maps And Guest AI, Page 2 |
| Guest Generation, Park Capacity, And Peep Factory, Page 2 |
| Setting Up And Switching Your Park Entrance, Page 2 |
| Theming Our Stalls & Facilities, Page 2 |
| Our VIP Blue Book, Page 2 |
| Our VIP Blue Book, Page 3 |
| Our VIP Blue Book, Page 4: Spot The VIP's |
| Volitionist's RCT3 Animal Care Guide, Page 2 |
| Volitionist's RCT3 Animal Care Guide, Page 3 |
| Volitionist's RCT3 Animal Care Guide, Page 4 |
| How To Unlock All Campaign Scenarios, Page 2 |
| The Care And Feeding of Custom Downloads, Page 2 |
| The Care And Feeding of Custom Downloads, Page 3 |
| The Care And Feeding of Custom Downloads, Page 4 |
| RCT3 Cheats & Unlockables, Page 2 |
| Options.txt Flags, Page 2 |
| Options.txt Flags, Page 3 |
| RCT3 Keyboard & Mouse Controls: Advanced |
| RCT3 Keyboard & Mouse Controls: Freelook |
| RCT3 Keyboard & Mouse Controls: Isometric |
| RCT3 Keyboard & Mouse Controls: Normal |
| Guests Departing The Station But Not Returning |
| Guests Knocked Over |
| People Spilling Down Stairs |
| Lost Staff |
| ReAppearing Invisible Vendors |
| Park File Thumbnails |
| RCT3 Freezes |
| Earthquakes and Plumbing |
| The Importer |
| SketchUp |
| Reviewing RCT3’s History, Page 2 |
| Chris Sawyer, Page 2 |
| Showcase!: Fall 2020, TNS Pool Paths & TNS Pool Terrain, Page 2 |
| Showcase!: Fall 2020, TNS Pool Paths & TNS Pool Terrain, Page 3 |
| Showcase!: Fall 2020, TNS Pool Paths & TNS Pool Terrain, Page 4 |
| Showcase: Spring 2019 - DasMatze's Fences & Railings, Page 2 |
| Showcase: Spring 2019 - DasMatze's Fences & Railings, Page 3 |
| Showcase: Spring 2019 - DasMatze's Fences & Railings, Page 4 |
| Showcase: Fall 2018 - L-33/Lee, Page 2 |
| Showcase: Fall 2018 - L-33/Lee, Page 3 |
| Showcase: Fall 2018 - L-33/Lee, Page 4 |
| Showcase: Spring 2018 - Spez Mies Wall Set, Page 2 |
| Showcase: Winter 2017 - Mr. Sion's Tiki Bar, Page 2 |
| Showcase: Fall 2017 - Polynesian Panic, Page 2 |
| Hall of Fame: Belgabor's Invisible Doodads |
| Hall of Fame: Spice's Invisible Pool CS |
| Hall of Fame: GTT's Hedge Maze |
| Hall of Fame: GTT's Glas Labyrinth |
| Hall of Fame: Joey's Park CleanUp |
| Hall of Fame: GTT's Hedge Maze, Page 2 |
| My Adventures In SketchUp |
| CSO's I Have Imported |
| TexMod Customized Add-Ins |
| My Parks |
| Videos |
| Screenshots |
| Advertisement Land |
| Intrepid: A Revolution In Design |
| Structure And Ride Supports Set |
| CSO Study: GTT’s Hedge Maze |
| Wonderland Themed Playing Card Railings |
| Architectural Chess |
| Mini Chess |
| Planters 'n' Fountains Set |
| Intrepid: A Revolution In Design, Page 2 |
| Intrepid: A Revolution In Design, Page 3 |
| Intrepid: A Revolution In Design, Page 4 |
| Structure And Ride Supports Set, Page 2 |
| Café, Update 1 |
| Path Add-Ons, Update 1 |
| Planters And Pool Fencing, Page 2 |
| Landscaping And Park Grounds, Page 2 |
| Walls, Tunnels, And Fences, Page 2 |
| Decking, Stairs, And Balustrades Set, Page 2 |
| Decking, Stairs, And Balustrades Set, Page 3 |
| CFR & CTR CSO's, Page 2 |
| CFR & CTR CSO's, Page 3 |
| CFR & CTR CSO's, Update 1, Page 1 |
| CFR & CTR CSO's, Update 1, Page 2 |
| TexMod Tutorial |
| My TexMod Skies |
| TexMod MakeOvers For My Park |
| TexMod MakeOvers For My Park, Page 2 |
| Vanguard West |
| Vanguard West: Financial Report |
| Hillside On The Lake |
| Hillside On The Lake: Financial Summary |
| A Woodland Clearing |
| Vanguard West, Page 2 |
| Vanguard West, Page 3 |
| Vanguard West, Page 4 |
| Vanguard West, Page 5 |
| Vanguard West, Page 6 |
| Vanguard West: Financial Report, Page 2 |
| Vanguard West: Financial Report, Page 3 |
| Hillside On The Lake, Page 2 |
| Hillside On The Lake, Page 3 |
| Hillside On The Lake, Page 4 |
| Hillside On The Lake, Page 5 |
| Hillside On The Lake, Page 6 |
| Hillside On The Lake: Financial Summary, Page 2 |
| Hillside On The Lake: Financial Summary, Page 3 |
| Hillside On The Lake: Financial Summary, Page 4 |
| Hillside On The Lake: Financial Summary, Page 5 |
| A Woodland Clearing, Page 2 |
| Screenshots, Page 2 |
| Screenshots, Page 3 |
| Screenshots, Page 4 |
| Screenshots, Page 5 |
| Advertisement Land, Page 2 |
| Collaborations - Custom Content |
| Collaborations - Parks |
| L-33's POE Building 4 Set |
| RCT2 Wonderland Themed CSO's |
| The Crüe |
| L-33's POE Building 4 Set, Page 2 |
| RCT2 Wonderland Themed CSO's, Page 2 |
| POE Building 4 Set Presentation Park |
| POE Building 4 Set Presentation Park, Page 2 |
| POE Building 4 Set Presentation Park, Page 3 |
| POE Building 4 Set Presentation Park, Page 4 |
| POE Building 4 Set Presentation Park, Page 5 |
| How To Use Park CleanUp, Page 2 |
| How To Use Park CleanUp, Page 3 |
| Park Admission, Ride Pricing, And EI&N, Page 2 |
| Maximizing Your Small Park's Real Estate, Page 2 |
| Park Shuttle Configurations, Page 2 |
| Elevated Coaster Stations And Access Options, Page 2 |
| Suspended Pools And Guest Access Options, Page 2 |
| Terrain Painting - Artistry In Landscaping, Page 2 |
| Terrain Painting - Artistry In Landscaping, Page 3 |
| How To Build A Great Park, Page 2 |
| Optimize Your System And Enhance Your Gaming Experience, Page 2 |
| Custom Scenery |
| TexMod ReTexture Packs |
| Miscellaneous |
| Parks, Scenarios, & Sandboxes |
| Coasters, Rides, & Attractions |
| Structure And Ride Supports - Original Concrete |
| Structure And Ride Supports - Hewn Brick |
| RCT2 Wonderland Themed Set |
| RCT2 Revival Crüe Chess |
| FTA's Invisible Stall With Invisible Vendor |
| RCT3 Launch Screen Slideshow Template |
| Dark Ride Enclosure Toppers |
