

This website views at its very best in Firefox web browser, and is not available in a mobile version.
Copyright © All Rights Reserved | Built by Serif Templates


|
|
|
|
|
|
|
A tutorial on the entire process of Importing is beyond the scope of this article. However there are enough differences between Importing standard CSO's and Importing car models that we feel the need to specifically point those differences out here. This article will therefore skim over the Importing process while detailing only what's necessary to the process of getting a car successfully imported. |
||||
|
|
|
|
|
|
|
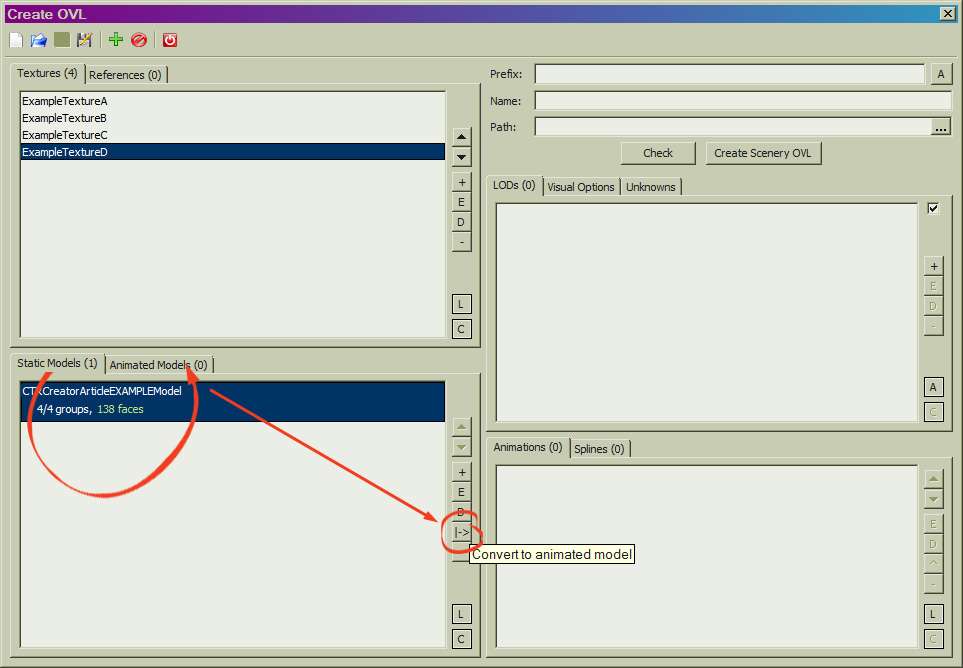
The first thing to remember when importing custom cars is that they are processed as animated models even if the car does not come with animated doors, animated restraints, or animated features. Car models, therefore, are always entered into the importer with the Animated Models tab. |
||||
|
|
|
|
|
|
|
|
||||
|
If you erroneously begin Importing your car model as a static model and after that remember it should be an animated model you can simply switch your model over from the Static Models tab into the Animated Models tab. |
||||
|
|
|
|
|
|
|
|
||||
|
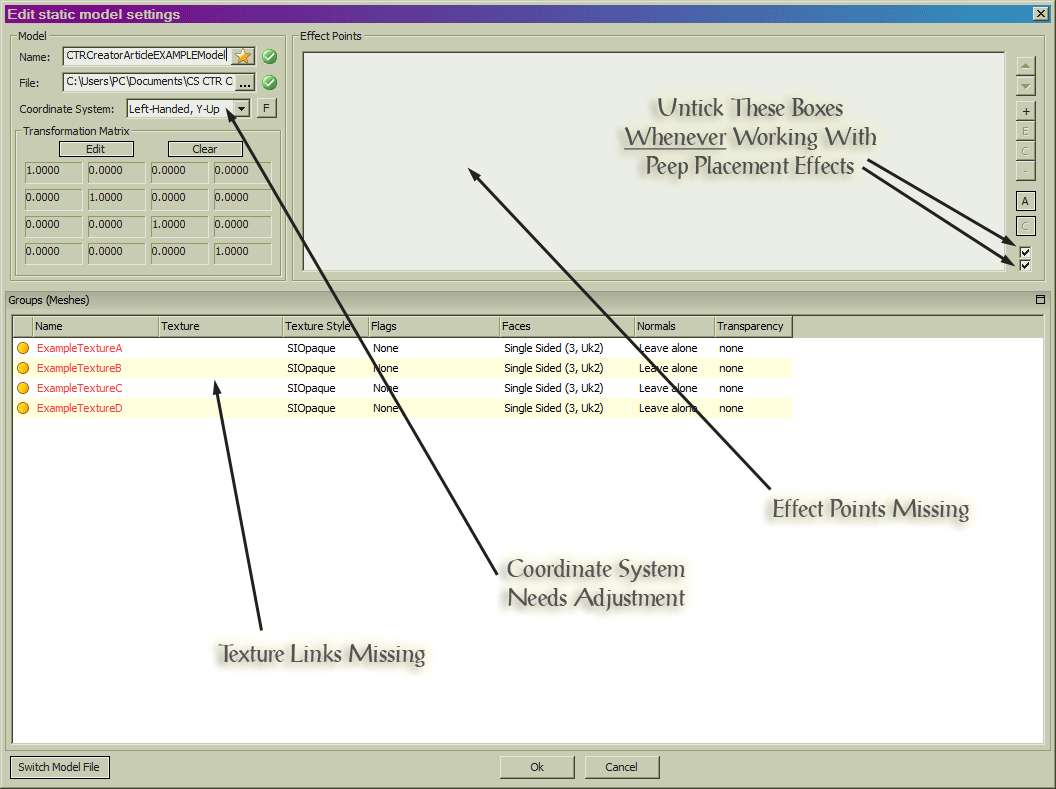
Now let's double- |
||||
|
|
|
|
|
|
|
|
||||
|
Sorted. |
||||
|
|
|
|
|
|
|
|
||||
|
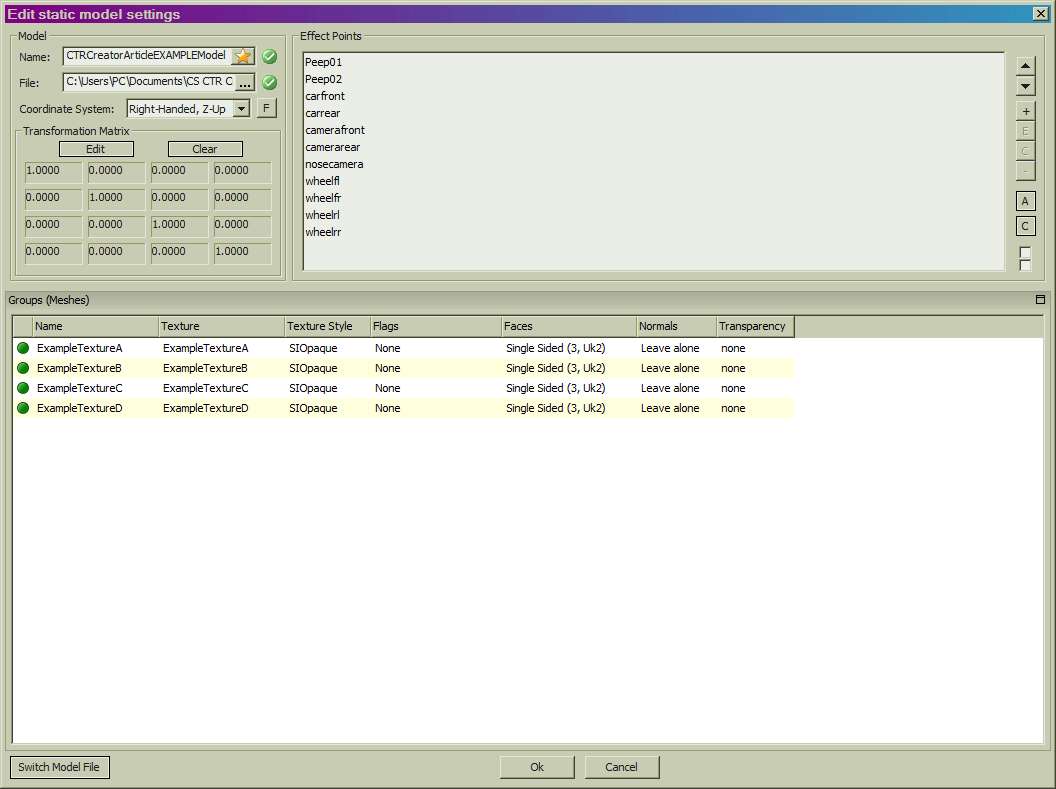
Unlike with CSO's, with Animated Models all we need to do with basic Effect Bones is to get them into the Effect Points window. |
||||
|
|
|
|
|
|
|
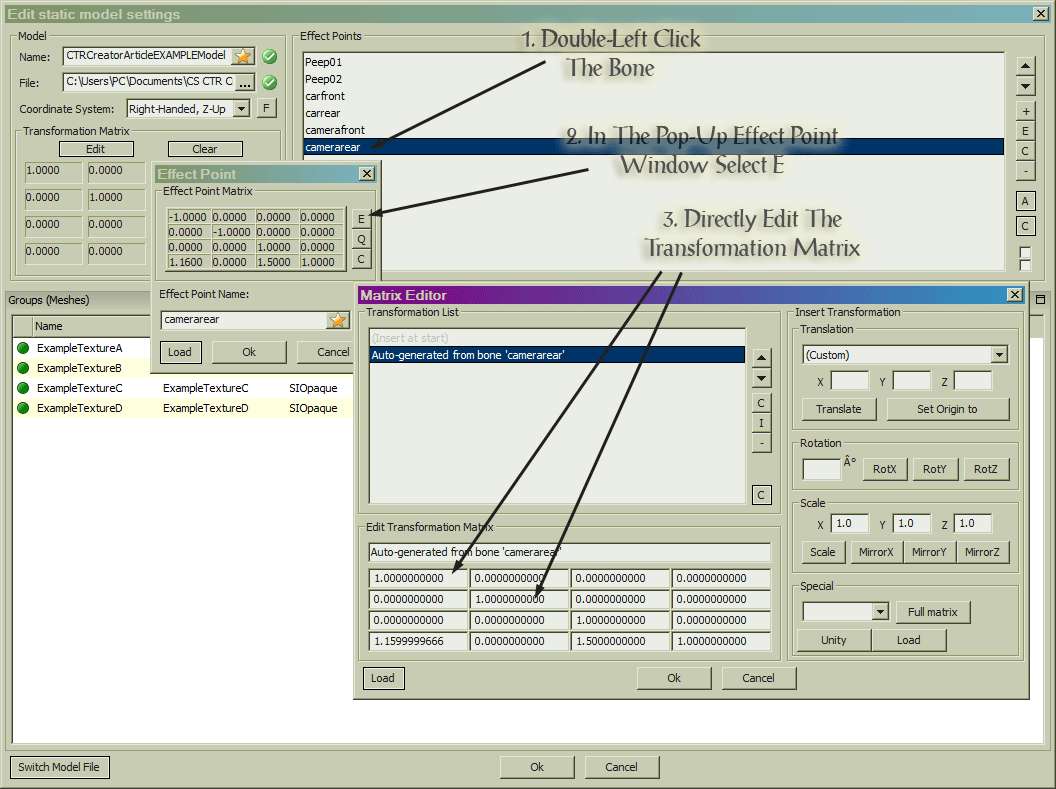
After you have done that, if you wish the rear camera to face rearwards from your car now is the time to do that. What we want to do is to edit the matrix and not insert a transformation (as we would with CSO's) so we don't use the Insert Transformation side of the Matrix Editor dialog - |
||||
|
|
|
|
|
|
|
By the way, if you want peeps in your car to face the rear of the car you'd accomplish that using this same method. |
||||
|
|
|
|
|
|
|
|
||||
|
Sorted. |
||||
|
|
|
|
|
|
|
|
||||
|
Select OK until you've returned to the Create OVL window. |
||||
|
|
|
|
|
|
|
Next: |
||||
|
|
|
|
|
|
|
|
► |
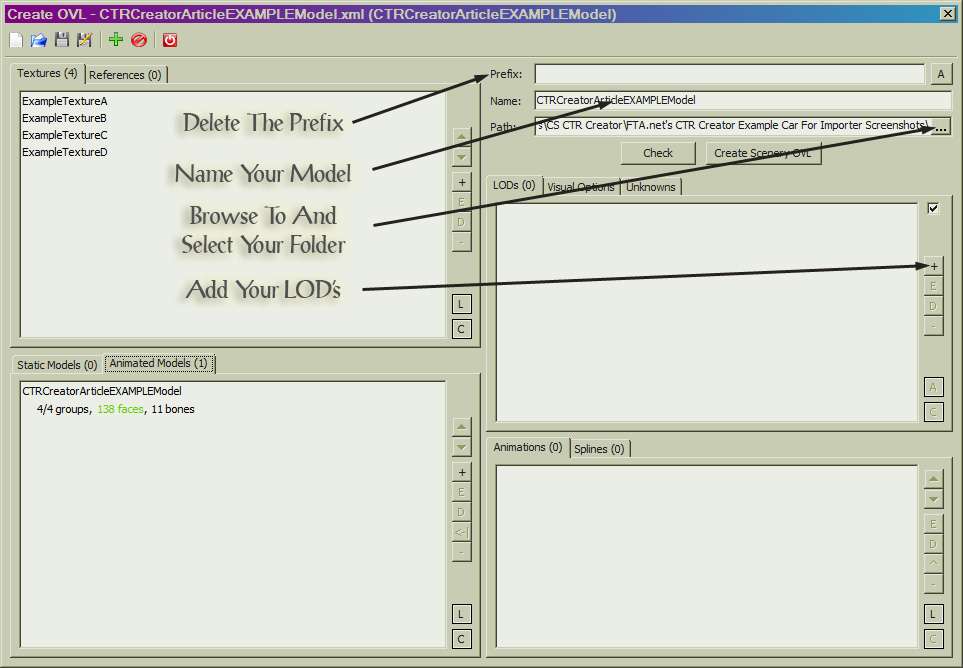
delete the Prefix, |
||
|
|
► |
copy and paste the name of your model from the Edit Animated Model window into the name field here, |
||
|
|
► |
browse to and select the folder in which are your ASE, your WagenDaten_, & your texture(s), and then |
||
|
|
► |
click on the + at the right to add your LOD's. |
||
|
|
|
|
|
|
|
|
||||
|
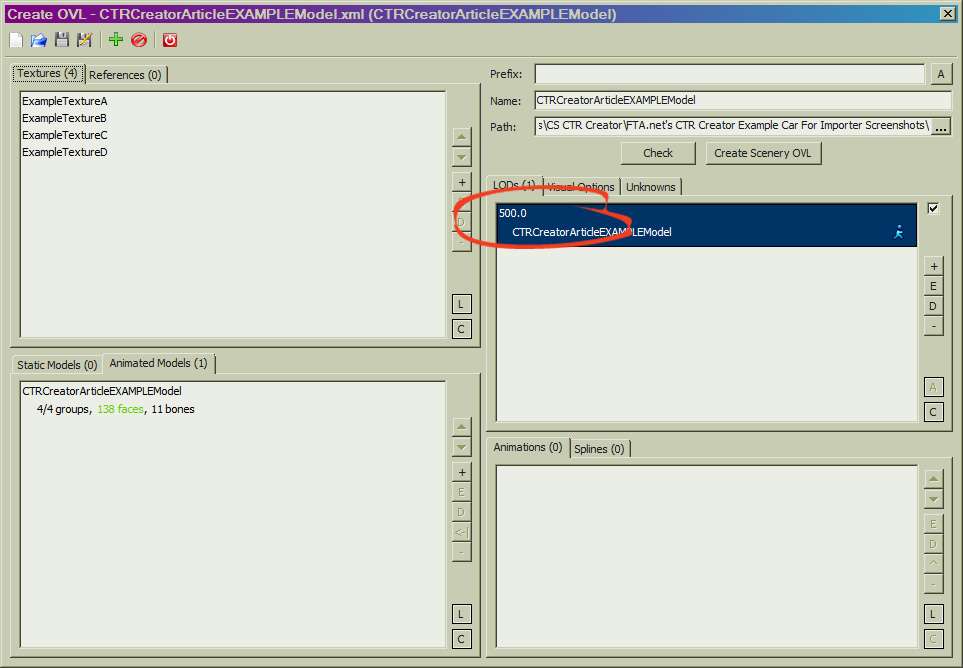
After you've selected + to add your LOD's the Edit Level Of Detail window will display with a default value of 0.0. |
||||
|
|
|
|
|
|
|
|
||||
|
A value of 500.0 is a good all- |
||||
|
|
|
|
|
|
|
|
||||
|
We're all ready to go so left- |
||||
|
|
|
|
|
|
|
|
||||
|
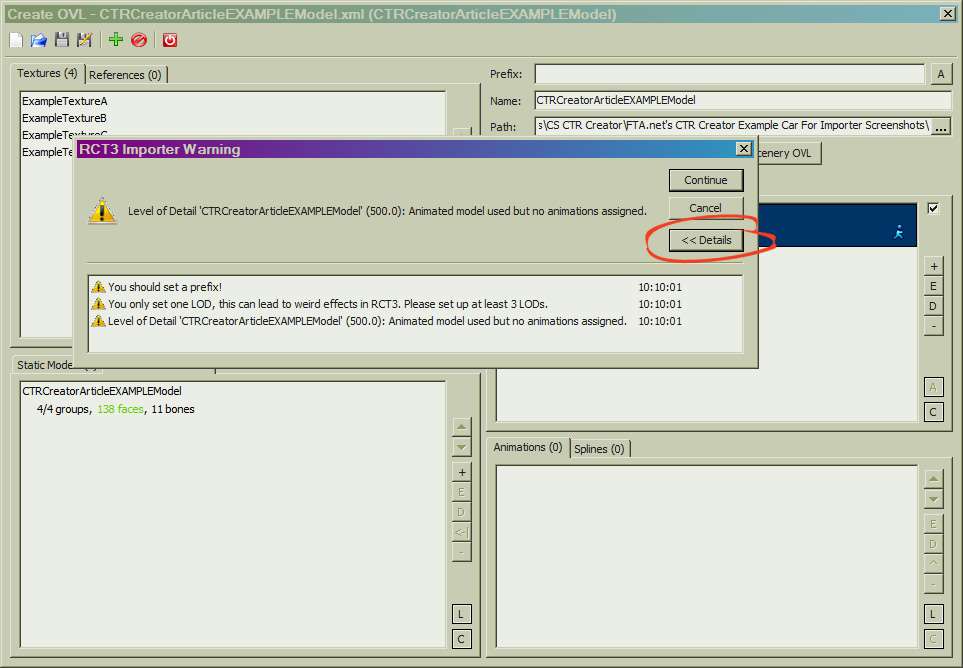
Our error message will be made up of three warnings which we can read by clicking on the Details toggle: |
||||
|
|
|
|
|
|
|
|
► |
As we're not creating a Themed Folder and are in fact using the Importer as a third- |
||
|
|
► |
When our car model is completed we can add all three LOD's then. Progressing with our car model will be simpler with only one LOD for now. |
||
|
|
► |
CTR Creator does not accept static models as car models, therefore they need to be imported in the Animated Models dialog. Because we know we haven't included actual animations with our car model we may ignore this caution. |
||
|
|
|
|
|
|
|
Click the continue toggle. After you do this don't move the cursor or do anything with the keyboard. If we do anything else at this time we risk bringing another process to the front of the operating system and the Importer won't display this next message. |
||||
|
|
|
|
|
|
|
|
||||
|
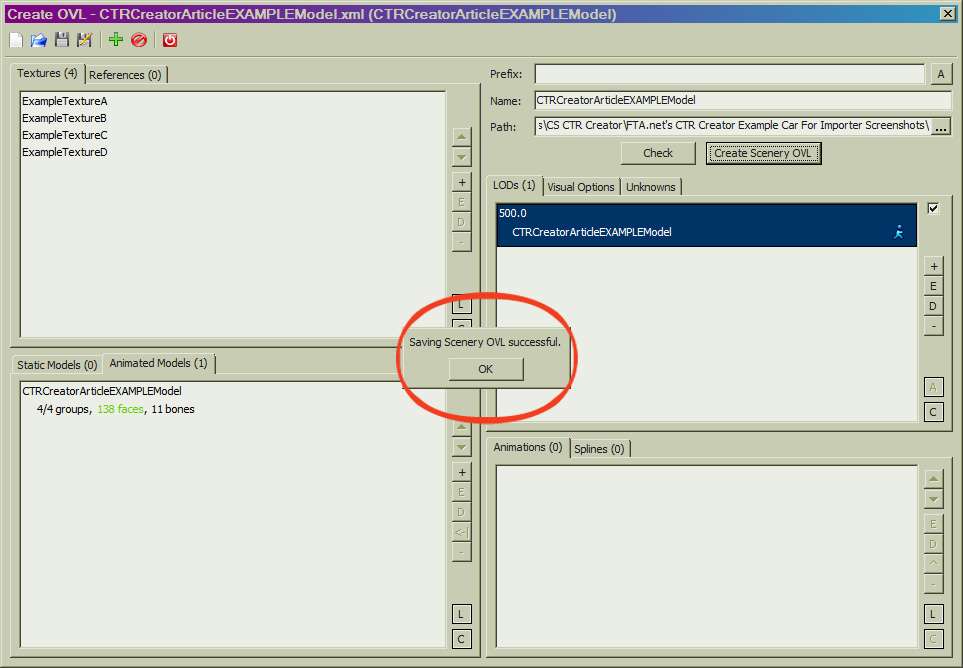
And there in the middle of our display, like a breath of fresh air, is the message indicating our OVL save was successful. Our car OVL's will now be ready in our folder for use with CTR Creator. By now your folder should have in it |
||||
|
|
|
|
|
|
|
|
► |
your car model ASE, |
||
|
|
► |
your WagenDaten_ TXT file, |
||
|
|
► |
your texture(s), and now |
||
|
|
► |
your car OVL's |
||
|
|
|
|
|
|
|
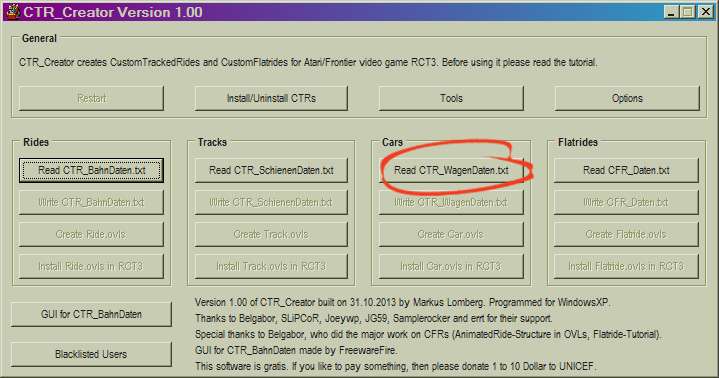
CTR Creator will look for all of these files to be in the same folder in which it reads the WagenDaten_. If all of these files are where they should be we're ready for the next step with CTR Creator so let's close the Importer and launch CTR Creator. What we want to do next is for CTR Creator to read the WagenDaten_ we've already prepared so we'll hit this toggle. |
||||
|
|
|
|
|
|
|
|
||||
|
The appearance of the display will change with two new toggles appearing below the one just selected. |
||||
|
|
|
|
|
|
|
|
||||
|
We may do one of two things at this time: |
||||
|
|
|
|
|
|
|
|
► |
We can choose to overwrite our WagenDaten_. If we select this toggle, missing field values will be filled in and any values with incorrect names will be written over with the correct field names. After that we could hit the toggle to create our car OVL's. |
||
|
|
► |
If we're sure about our WagenDaten_ entries we could move directly on to creating our car OVL's which we've done in this example. |
||
|
|
|
|
|
|
|
Although there won't be any message indicating your car OVLS have been created your folder will now have in it an additional folder called CTR_EXAMPLEModelCar. Your folder name will start with CTR_ and end with the actual name of your car model. What CTR Creator has done is taken the car OVL's we made with the Importer and converted them for use in the game as a ride car. This CTR_ folder may now be placed directly into our Cars/TrackedRideCars folder. To see our car in the game all we need to do is to set up a BahnDaten_ TXT file that calls for the use of our car, run that BahnDaten_ through CTR Creator, and then in RCT3 build the track to which we’ve added our Car_ as a car type. |
||||
|
|
|
|
|
|
|
This car folder may also be uploaded and shared with other community members so that they may create a track of their own with your car on it. |
||||
|
|
|
|
|
|
|
Should you need to know what sorts of information are required in the BahnDaten_, our previous session, BahnDaten_ Keyword Values, has shown what sorts of information need to be included so that CTR Creator can make your track OVL's. |
||||
|
|
|
|
|
|
|
Drag the above toggle to a convenient place on your screen. |
|
|
|
|
The Ultimate CTR Creator


| Viewing Full-Sized Images On This Website |
| Effective Park Design: The Best Start For Your Park, Page 2 |
| Master Maps And Guest AI, Page 2 |
| Guest Generation, Park Capacity, And Peep Factory, Page 2 |
| Setting Up And Switching Your Park Entrance, Page 2 |
| Theming Our Stalls & Facilities, Page 2 |
| Our VIP Blue Book, Page 2 |
| Our VIP Blue Book, Page 3 |
| Our VIP Blue Book, Page 4: Spot The VIP's |
| Volitionist's RCT3 Animal Care Guide, Page 2 |
| Volitionist's RCT3 Animal Care Guide, Page 3 |
| Volitionist's RCT3 Animal Care Guide, Page 4 |
| How To Unlock All Campaign Scenarios, Page 2 |
| The Care And Feeding of Custom Downloads, Page 2 |
| The Care And Feeding of Custom Downloads, Page 3 |
| The Care And Feeding of Custom Downloads, Page 4 |
| RCT3 Cheats & Unlockables, Page 2 |
| Options.txt Flags, Page 2 |
| Options.txt Flags, Page 3 |
| RCT3 Keyboard & Mouse Controls: Advanced |
| RCT3 Keyboard & Mouse Controls: Freelook |
| RCT3 Keyboard & Mouse Controls: Isometric |
| RCT3 Keyboard & Mouse Controls: Normal |
| Guests Departing The Station But Not Returning |
| Guests Knocked Over |
| People Spilling Down Stairs |
| Lost Staff |
| ReAppearing Invisible Vendors |
| Park File Thumbnails |
| RCT3 Freezes |
| Earthquakes and Plumbing |
| The Importer |
| SketchUp |
| Reviewing RCT3’s History, Page 2 |
| Chris Sawyer, Page 2 |
| Showcase!: Fall 2020, TNS Pool Paths & TNS Pool Terrain, Page 2 |
| Showcase!: Fall 2020, TNS Pool Paths & TNS Pool Terrain, Page 3 |
| Showcase!: Fall 2020, TNS Pool Paths & TNS Pool Terrain, Page 4 |
| Showcase: Spring 2019 - DasMatze's Fences & Railings, Page 2 |
| Showcase: Spring 2019 - DasMatze's Fences & Railings, Page 3 |
| Showcase: Spring 2019 - DasMatze's Fences & Railings, Page 4 |
| Showcase: Fall 2018 - L-33/Lee, Page 2 |
| Showcase: Fall 2018 - L-33/Lee, Page 3 |
| Showcase: Fall 2018 - L-33/Lee, Page 4 |
| Showcase: Spring 2018 - Spez Mies Wall Set, Page 2 |
| Showcase: Winter 2017 - Mr. Sion's Tiki Bar, Page 2 |
| Showcase: Fall 2017 - Polynesian Panic, Page 2 |
| Hall of Fame: Belgabor's Invisible Doodads |
| Hall of Fame: Spice's Invisible Pool CS |
| Hall of Fame: GTT's Hedge Maze |
| Hall of Fame: GTT's Glas Labyrinth |
| Hall of Fame: Joey's Park CleanUp |
| Hall of Fame: GTT's Hedge Maze, Page 2 |
| My Adventures In SketchUp |
| CSO's I Have Imported |
| TexMod Customized Add-Ins |
| My Parks |
| Videos |
| Screenshots |
| Advertisement Land |
| Intrepid: A Revolution In Design |
| Structure And Ride Supports Set |
| CSO Study: GTT’s Hedge Maze |
| Wonderland Themed Playing Card Railings |
| Architectural Chess |
| Mini Chess |
| Planters 'n' Fountains Set |
| Intrepid: A Revolution In Design, Page 2 |
| Intrepid: A Revolution In Design, Page 3 |
| Intrepid: A Revolution In Design, Page 4 |
| Structure And Ride Supports Set, Page 2 |
| Café, Update 1 |
| Path Add-Ons, Update 1 |
| Planters And Pool Fencing, Page 2 |
| Landscaping And Park Grounds, Page 2 |
| Walls, Tunnels, And Fences, Page 2 |
| Decking, Stairs, And Balustrades Set, Page 2 |
| Decking, Stairs, And Balustrades Set, Page 3 |
| CFR & CTR CSO's, Page 2 |
| CFR & CTR CSO's, Page 3 |
| CFR & CTR CSO's, Update 1, Page 1 |
| CFR & CTR CSO's, Update 1, Page 2 |
| TexMod Tutorial |
| My TexMod Skies |
| TexMod MakeOvers For My Park |
| TexMod MakeOvers For My Park, Page 2 |
| Vanguard West |
| Vanguard West: Financial Report |
| Hillside On The Lake |
| Hillside On The Lake: Financial Summary |
| A Woodland Clearing |
| Vanguard West, Page 2 |
| Vanguard West, Page 3 |
| Vanguard West, Page 4 |
| Vanguard West, Page 5 |
| Vanguard West, Page 6 |
| Vanguard West: Financial Report, Page 2 |
| Vanguard West: Financial Report, Page 3 |
| Hillside On The Lake, Page 2 |
| Hillside On The Lake, Page 3 |
| Hillside On The Lake, Page 4 |
| Hillside On The Lake, Page 5 |
| Hillside On The Lake, Page 6 |
| Hillside On The Lake: Financial Summary, Page 2 |
| Hillside On The Lake: Financial Summary, Page 3 |
| Hillside On The Lake: Financial Summary, Page 4 |
| Hillside On The Lake: Financial Summary, Page 5 |
| A Woodland Clearing, Page 2 |
| Screenshots, Page 2 |
| Screenshots, Page 3 |
| Screenshots, Page 4 |
| Screenshots, Page 5 |
| Advertisement Land, Page 2 |
| Collaborations - Custom Content |
| Collaborations - Parks |
| L-33's POE Building 4 Set |
| RCT2 Wonderland Themed CSO's |
| The Crüe |
| L-33's POE Building 4 Set, Page 2 |
| RCT2 Wonderland Themed CSO's, Page 2 |
| POE Building 4 Set Presentation Park |
| POE Building 4 Set Presentation Park, Page 2 |
| POE Building 4 Set Presentation Park, Page 3 |
| POE Building 4 Set Presentation Park, Page 4 |
| POE Building 4 Set Presentation Park, Page 5 |
| How To Use Park CleanUp, Page 2 |
| How To Use Park CleanUp, Page 3 |
| Park Admission, Ride Pricing, And EI&N, Page 2 |
| Maximizing Your Small Park's Real Estate, Page 2 |
| Park Shuttle Configurations, Page 2 |
| Elevated Coaster Stations And Access Options, Page 2 |
| Suspended Pools And Guest Access Options, Page 2 |
| Terrain Painting - Artistry In Landscaping, Page 2 |
| Terrain Painting - Artistry In Landscaping, Page 3 |
| How To Build A Great Park, Page 2 |
| Optimize Your System And Enhance Your Gaming Experience, Page 2 |
| Custom Scenery |
| TexMod ReTexture Packs |
| Miscellaneous |
| Parks, Scenarios, & Sandboxes |
| Coasters, Rides, & Attractions |
| Structure And Ride Supports - Original Concrete |
| Structure And Ride Supports - Hewn Brick |
| RCT2 Wonderland Themed Set |
| RCT2 Revival Crüe Chess |
| FTA's Invisible Stall With Invisible Vendor |
| RCT3 Launch Screen Slideshow Template |
| Dark Ride Enclosure Toppers |

