

This website views at its very best in Firefox web browser, and is not available in a mobile version.
Copyright © All Rights Reserved | Built by Serif Templates


|
Restraints With Multiple Child Bones |
||||
|
|
|
|
|
|
|
It's possible to create restraints that are beyond the basic restraint animations just demonstrated and in view of achieving this we'll show you how to create animations with more than one Child bone. Getting such animations to work in your game requires work similar to that we've taken on board in the previous session in addition to a final step being added to the XML which we'll get to shortly. |
||||
|
|
|
|
|
|
|
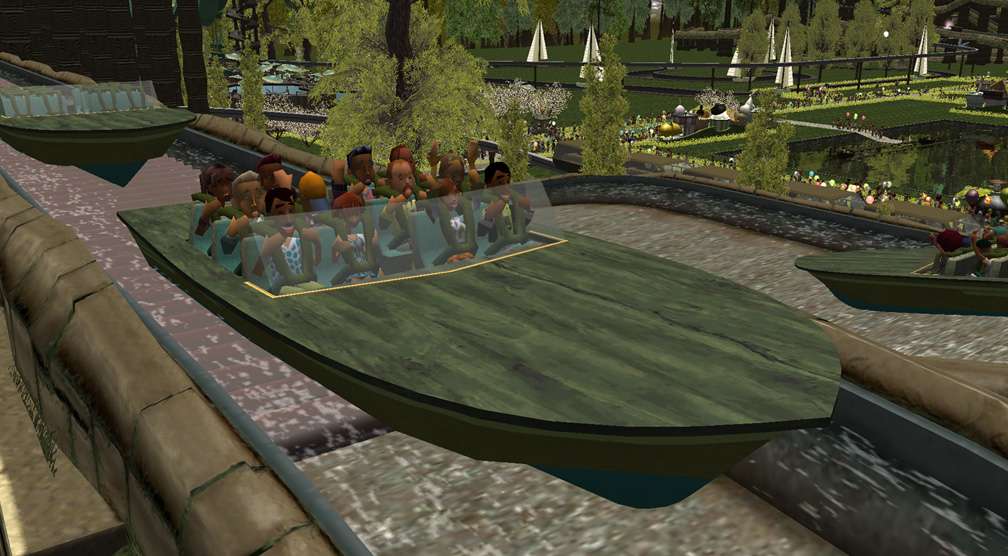
We've created, tested, and textured a Power Boat car along with temporarily static restraints for our White Water Rapids CTR. Although we hadn't as yet selected some of the texture styles for our car we've used this car for the demonstration. |
||||
|
|
|
|
|
|
|
|
||||
|
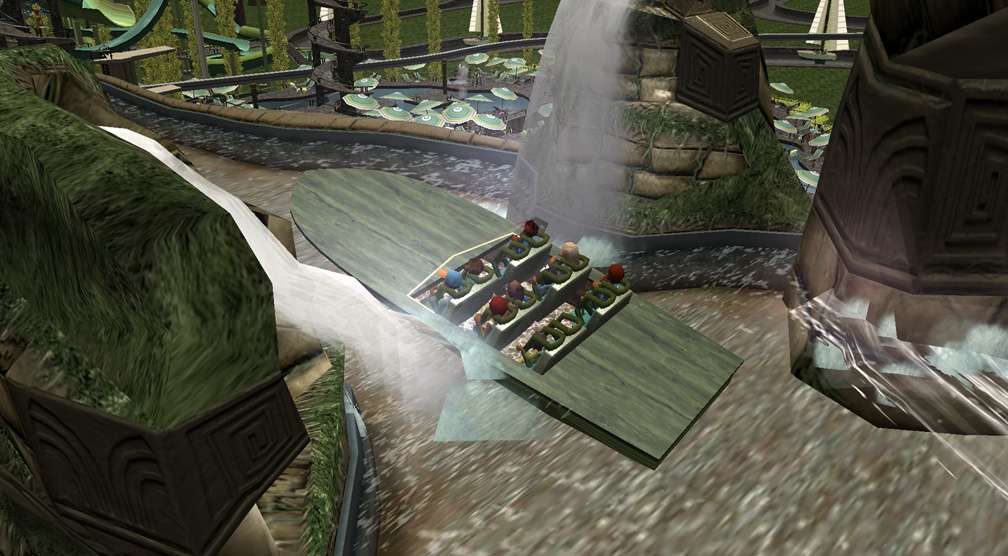
With this track's EI&N rating of 27, 5, & 3, it's easy to see why this boat needs restraints. |
||||
|
|
|
|
|
|
|
|
||||
|
If you've reviewed these sessions in order, when looking over these next XML's you'll know the reasoning behind each line of entry and what their values represent. In view of that we'll just fill in the required data, display the XML's, and only touch upon the additional steps required. |
||||
|
|
|
|
|
|
|
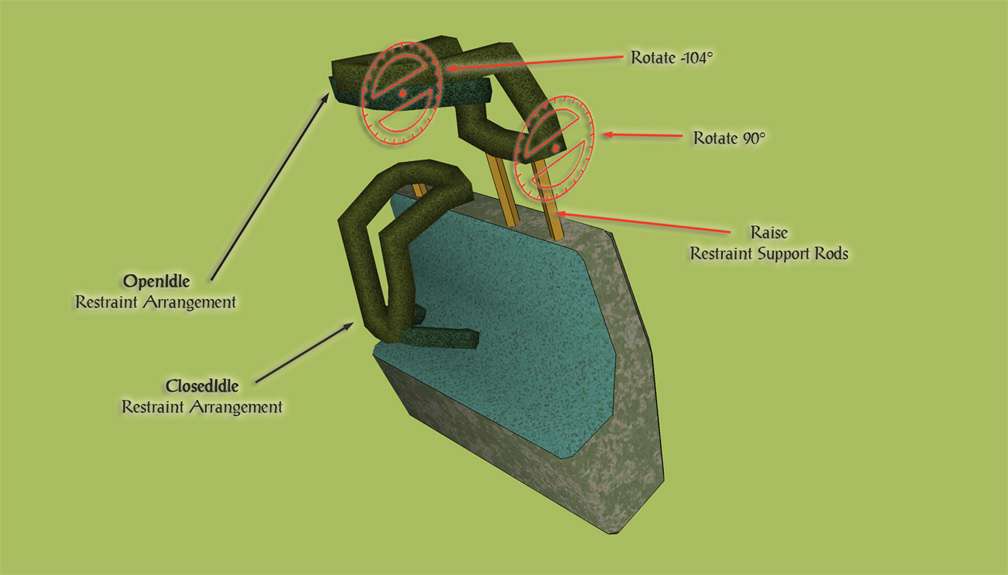
The previous header showed how to animate a simple restraint with a single rotation in a car with four seats. Our car in this session has twelve seats and our aim this time around is to achieve a restraint that opens in three stages as outlined in the diagram below with the Peep01 position. |
||||
|
|
|
|
|
|
|
|
||||
|
In SketchUp we've already precisely placed the child bone crosshairs, have tested the movements & rotations, and have decided upon the values for each transition. |
||||
|
|
|
|
|
|
|
|
||||
|
|
|
|
|
|
|
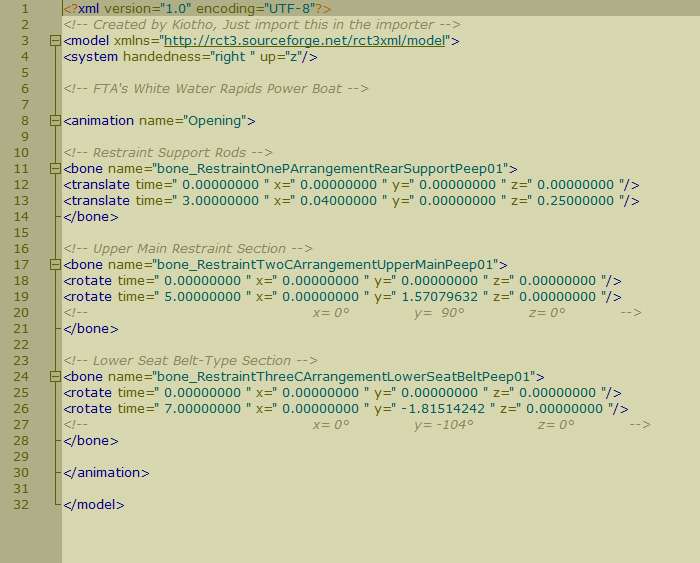
Because our seat leans back at a 10° angle and the pivot support rods lean back at a matching angle, our XML will need to reflect a slight movement of the support rods along the X axis in addition to the main movement of the rods being lifted along the Z axis. Of course, we've also added the two rotations. |
||||
|
|
|
|
|
|
|
|
||||
|
|
|
|
|
|
|
As expected, the OpenIdle XML is the one holding all the meshes in their opened positions. The 0 timings entered here aren't considered by the game engine as it will hold the restraints in the OpenedIdle position as long as guests are boarding the train. |
||||
|
|
|
|
|
|
|
|
||||
|
|
|
|
|
|
|
When it comes to Closing restraint animations that involve multiple child bones sometimes the start of the Closing animation will snap or jerk into place instead of smoothly doing what we've set it up to do in our XML. The way to minimize this is to start out your Closing animation as if it's the OpenIdle animation. To do that, copy and paste in the data from OpenIdle into Closing and alter all the 0 timings to 1 second. Doing this will help ease your OpenIdle animation into your Closing. |
||||
|
|
|
|
|
|
|
|
||||
|
After this, add the required Closing animation data. As we did before, note the reversal of the timings in this set of data compared to the Opening data set. |
||||
|
|
|
|
|
|
|
|
||||
|
Extending OpenIdle into Closing by 1 second isn't a 100% reliable cure but it will increase the reliability of your Closing animation by decreasing the number of times the Closing animation jerks, and it will more often than not reduce the time span of this snappy movement. If you've done this and your Closing animation is still not as smooth as you'd like, if you won't mind adding an extra step then view our later article Importing Your Peep Effects As Child Bones. Even in projects with single child bone restraints, setting up your Peep effects as bones in this way will eliminate any snapping, jerky movements. |
||||
|
|
|
|
|
|
|
|
|
|
|
|
|
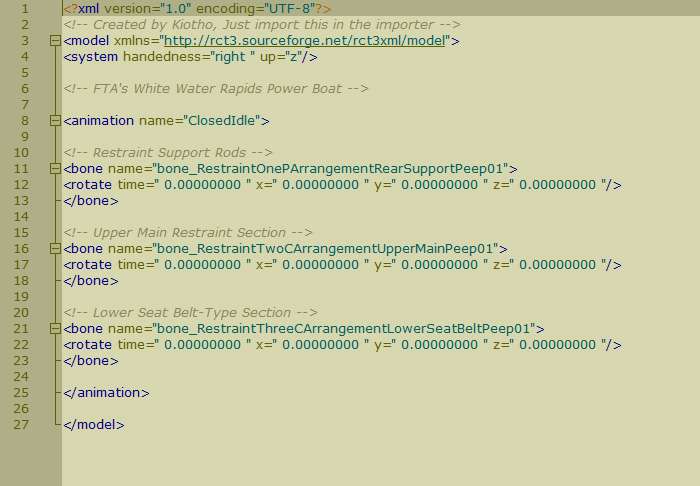
As always, with all the values at 0 the ClosedIdle XML is the simplest. |
||||
|
|
|
|
|
|
|
Beneath our header, Troubleshooting Transition Errors, because all the 0 values indicate this is a static animation we've matched up all the 'transitions' and have altered line 12 from a translate transition to a rotate transition. If you'd prefer you could change all the transitions from rotate to translate. |
||||
|
|
|
|
|
|
|
|
||||
|
|
|
|
|
|
|
Whether we ultimately use these animations to test only the Peep01 seat or if we completed these XML's for all twelve seats, if we choose to Import these multiple child bone animations as they stand, when attempting to build our track in the game we'd get the Ride Train With No Seats error which would be followed by a game crash. After we've done everything right to include the Peep seating effects with our car this can be an unsettling situation to come across. |
||||
|
|
|
|
|
|
|
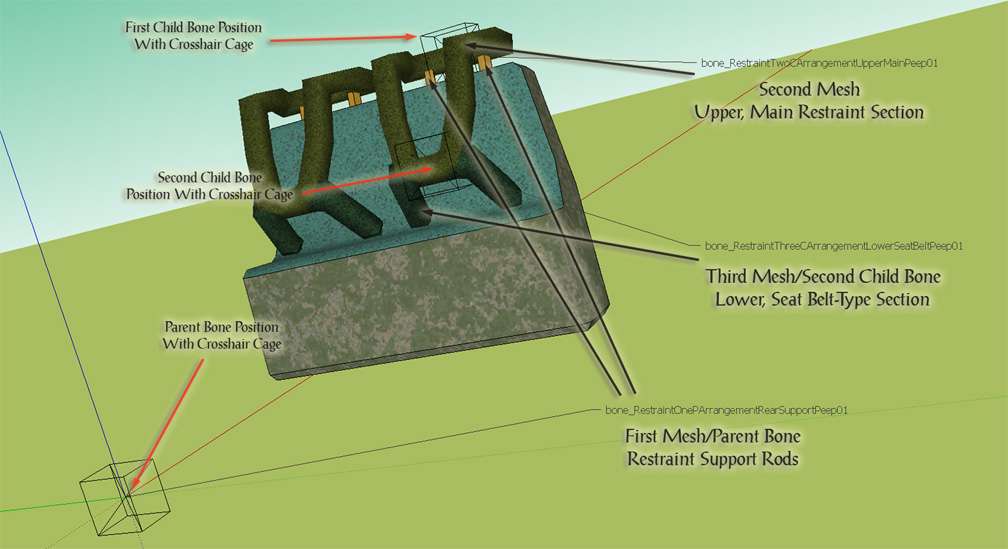
With the Peep effects in this car having now fallen below the radar what we need to do now is to specifically bring them to the attention of the game engine and the way to do that is to include them in our animations as if they are Child bones. In this example we've used the floor in our Power Boat car as the Parent bone mesh which means our model will now have two Parent Bones, one Parent bone for the restraints, and the other that we're about to set up now for the Peep effects. |
||||
|
|
|
|
|
|
|
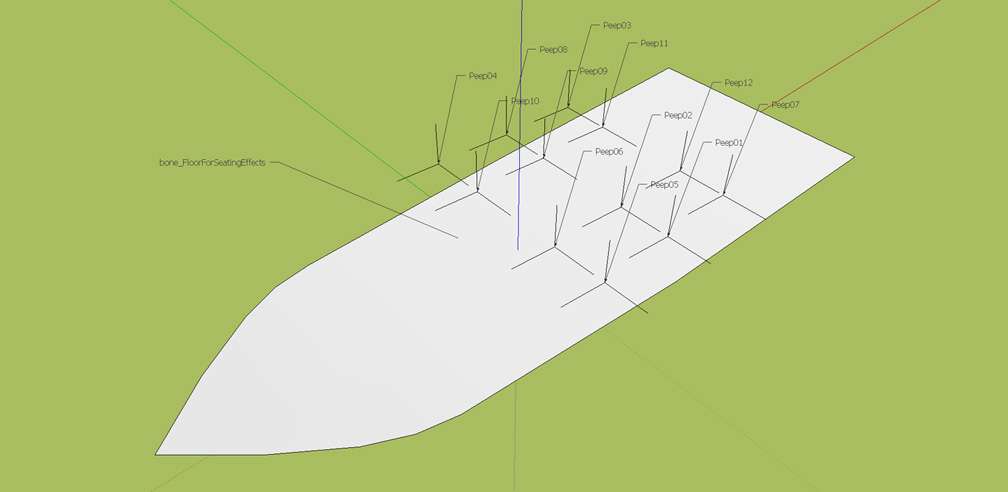
In this next image we've switched SketchUp's Faces view to Monochrome so we can easily see the Peep effects against the boat's floor. The floor of course is properly textured, is grouped with a name that identifies it throughout the Importing process as a Parent mesh, and will serve as the parent mesh to all twelve Peep effects when we set them up as Child bones. In this car model, just like all the other bones except the Child bones, the Parent bone to be linked to the floor mesh is placed with its crosshair cage at X+Y+Z=0 which as it happens in this image is at the track water's surface, below the boat's floor. The boat's floor, positioned exactly where it needs to be in relation to the remainder of the boat model, is around 20cm from Z=0. |
||||
|
|
|
|
|
|
|
|
||||
|
Separate set points are not required when setting up Peep effects as Child bones. When linked to their Parent bone each Peep effect will become both Child bone and set point and will all be assigned to the floor mesh, their Parent. Peep bones are named in exactly the same way (Peep01, Peep02, Peep03, etc.) whether they are Imported as standard effects or are set up as Child bones. |
||||
|
|
|
|
|
|
|
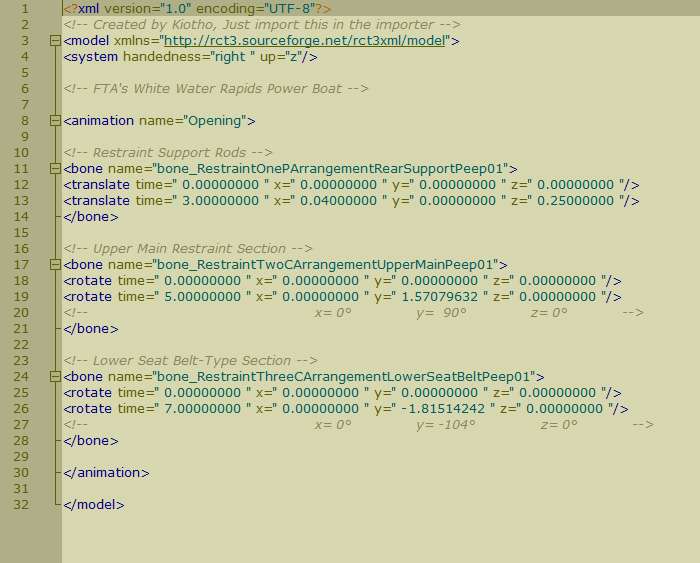
Let's review what our Opening XML looked like a few steps back. |
||||
|
|
|
|
|
|
|
|
||||
|
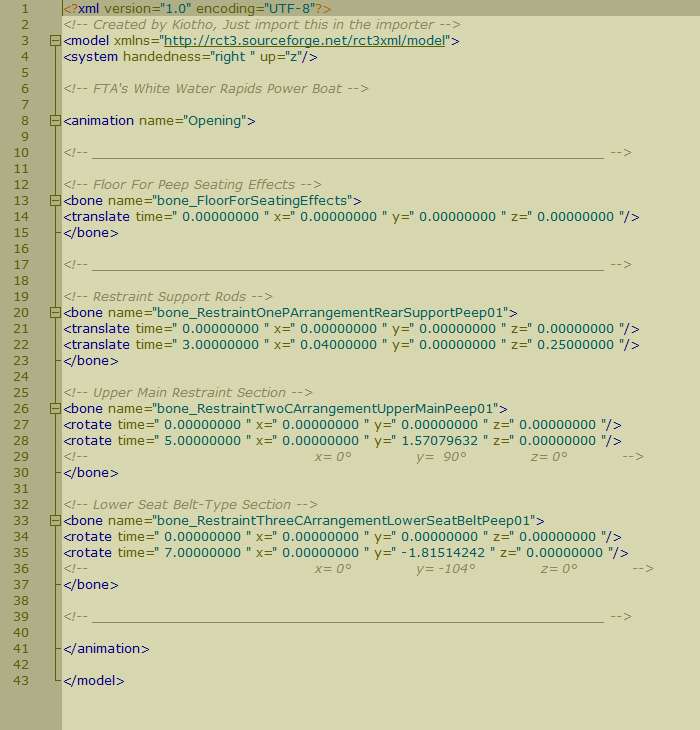
Taking into account that our Peep effects need a Parent bone, this is what our Opening XML will look like with that Parent bone added (see lines 12, 13, 14, and 15). |
||||
|
|
|
|
|
|
|
|
||||
|
Now we'll copy lines 19- |
||||
|
|
|
|
|
|
|
|
||||
|
Note the content of lines 12, 13, 14, and 15 only need to be included once in this XML. This same data will also only need to be included once in OpenIdle, Closing, and ClosedIdle. |
||||
|
|
|
|
|
|
|
Again, we've copied & pasted twelve sets of bone data in Opening because we have twelve seats in our car. You may need fewer or additional line sets depending on the number of seats you have in your own car. We're ready now to move on to the Importer. |
||||
|
|
|
|
|
|
|
Drag the above toggle to a convenient place on your screen. |
|
|
|
|
The Ultimate CTR Creator


| Viewing Full-Sized Images On This Website |
| Effective Park Design: The Best Start For Your Park, Page 2 |
| Master Maps And Guest AI, Page 2 |
| Guest Generation, Park Capacity, And Peep Factory, Page 2 |
| Setting Up And Switching Your Park Entrance, Page 2 |
| Theming Our Stalls & Facilities, Page 2 |
| Our VIP Blue Book, Page 2 |
| Our VIP Blue Book, Page 3 |
| Our VIP Blue Book, Page 4: Spot The VIP's |
| Volitionist's RCT3 Animal Care Guide, Page 2 |
| Volitionist's RCT3 Animal Care Guide, Page 3 |
| Volitionist's RCT3 Animal Care Guide, Page 4 |
| How To Unlock All Campaign Scenarios, Page 2 |
| The Care And Feeding of Custom Downloads, Page 2 |
| The Care And Feeding of Custom Downloads, Page 3 |
| The Care And Feeding of Custom Downloads, Page 4 |
| RCT3 Cheats & Unlockables, Page 2 |
| Options.txt Flags, Page 2 |
| Options.txt Flags, Page 3 |
| RCT3 Keyboard & Mouse Controls: Advanced |
| RCT3 Keyboard & Mouse Controls: Freelook |
| RCT3 Keyboard & Mouse Controls: Isometric |
| RCT3 Keyboard & Mouse Controls: Normal |
| Guests Departing The Station But Not Returning |
| Guests Knocked Over |
| People Spilling Down Stairs |
| Lost Staff |
| ReAppearing Invisible Vendors |
| Park File Thumbnails |
| RCT3 Freezes |
| Earthquakes and Plumbing |
| The Importer |
| SketchUp |
| Reviewing RCT3’s History, Page 2 |
| Chris Sawyer, Page 2 |
| Showcase!: Fall 2020, TNS Pool Paths & TNS Pool Terrain, Page 2 |
| Showcase!: Fall 2020, TNS Pool Paths & TNS Pool Terrain, Page 3 |
| Showcase!: Fall 2020, TNS Pool Paths & TNS Pool Terrain, Page 4 |
| Showcase: Spring 2019 - DasMatze's Fences & Railings, Page 2 |
| Showcase: Spring 2019 - DasMatze's Fences & Railings, Page 3 |
| Showcase: Spring 2019 - DasMatze's Fences & Railings, Page 4 |
| Showcase: Fall 2018 - L-33/Lee, Page 2 |
| Showcase: Fall 2018 - L-33/Lee, Page 3 |
| Showcase: Fall 2018 - L-33/Lee, Page 4 |
| Showcase: Spring 2018 - Spez Mies Wall Set, Page 2 |
| Showcase: Winter 2017 - Mr. Sion's Tiki Bar, Page 2 |
| Showcase: Fall 2017 - Polynesian Panic, Page 2 |
| Hall of Fame: Belgabor's Invisible Doodads |
| Hall of Fame: Spice's Invisible Pool CS |
| Hall of Fame: GTT's Hedge Maze |
| Hall of Fame: GTT's Glas Labyrinth |
| Hall of Fame: Joey's Park CleanUp |
| Hall of Fame: GTT's Hedge Maze, Page 2 |
| My Adventures In SketchUp |
| CSO's I Have Imported |
| TexMod Customized Add-Ins |
| My Parks |
| Videos |
| Screenshots |
| Advertisement Land |
| Intrepid: A Revolution In Design |
| Structure And Ride Supports Set |
| CSO Study: GTT’s Hedge Maze |
| Wonderland Themed Playing Card Railings |
| Architectural Chess |
| Mini Chess |
| Planters 'n' Fountains Set |
| Intrepid: A Revolution In Design, Page 2 |
| Intrepid: A Revolution In Design, Page 3 |
| Intrepid: A Revolution In Design, Page 4 |
| Structure And Ride Supports Set, Page 2 |
| Café, Update 1 |
| Path Add-Ons, Update 1 |
| Planters And Pool Fencing, Page 2 |
| Landscaping And Park Grounds, Page 2 |
| Walls, Tunnels, And Fences, Page 2 |
| Decking, Stairs, And Balustrades Set, Page 2 |
| Decking, Stairs, And Balustrades Set, Page 3 |
| CFR & CTR CSO's, Page 2 |
| CFR & CTR CSO's, Page 3 |
| CFR & CTR CSO's, Update 1, Page 1 |
| CFR & CTR CSO's, Update 1, Page 2 |
| TexMod Tutorial |
| My TexMod Skies |
| TexMod MakeOvers For My Park |
| TexMod MakeOvers For My Park, Page 2 |
| Vanguard West |
| Vanguard West: Financial Report |
| Hillside On The Lake |
| Hillside On The Lake: Financial Summary |
| A Woodland Clearing |
| Vanguard West, Page 2 |
| Vanguard West, Page 3 |
| Vanguard West, Page 4 |
| Vanguard West, Page 5 |
| Vanguard West, Page 6 |
| Vanguard West: Financial Report, Page 2 |
| Vanguard West: Financial Report, Page 3 |
| Hillside On The Lake, Page 2 |
| Hillside On The Lake, Page 3 |
| Hillside On The Lake, Page 4 |
| Hillside On The Lake, Page 5 |
| Hillside On The Lake, Page 6 |
| Hillside On The Lake: Financial Summary, Page 2 |
| Hillside On The Lake: Financial Summary, Page 3 |
| Hillside On The Lake: Financial Summary, Page 4 |
| Hillside On The Lake: Financial Summary, Page 5 |
| A Woodland Clearing, Page 2 |
| Screenshots, Page 2 |
| Screenshots, Page 3 |
| Screenshots, Page 4 |
| Screenshots, Page 5 |
| Advertisement Land, Page 2 |
| Collaborations - Custom Content |
| Collaborations - Parks |
| L-33's POE Building 4 Set |
| RCT2 Wonderland Themed CSO's |
| The Crüe |
| L-33's POE Building 4 Set, Page 2 |
| RCT2 Wonderland Themed CSO's, Page 2 |
| POE Building 4 Set Presentation Park |
| POE Building 4 Set Presentation Park, Page 2 |
| POE Building 4 Set Presentation Park, Page 3 |
| POE Building 4 Set Presentation Park, Page 4 |
| POE Building 4 Set Presentation Park, Page 5 |
| How To Use Park CleanUp, Page 2 |
| How To Use Park CleanUp, Page 3 |
| Park Admission, Ride Pricing, And EI&N, Page 2 |
| Maximizing Your Small Park's Real Estate, Page 2 |
| Park Shuttle Configurations, Page 2 |
| Elevated Coaster Stations And Access Options, Page 2 |
| Suspended Pools And Guest Access Options, Page 2 |
| Terrain Painting - Artistry In Landscaping, Page 2 |
| Terrain Painting - Artistry In Landscaping, Page 3 |
| How To Build A Great Park, Page 2 |
| Optimize Your System And Enhance Your Gaming Experience, Page 2 |
| Custom Scenery |
| TexMod ReTexture Packs |
| Miscellaneous |
| Parks, Scenarios, & Sandboxes |
| Coasters, Rides, & Attractions |
| Structure And Ride Supports - Original Concrete |
| Structure And Ride Supports - Hewn Brick |
| RCT2 Wonderland Themed Set |
| RCT2 Revival Crüe Chess |
| FTA's Invisible Stall With Invisible Vendor |
| RCT3 Launch Screen Slideshow Template |
| Dark Ride Enclosure Toppers |
