


This website views at its very best in Firefox web browser, and is not available in a mobile version.
Copyright © All Rights Reserved | Built by Serif Templates


|
|
|
|
|
|
|
Animating restraints is a step beyond animating doors because restraint animations require two bones arranged in a set. This bones set will require a Parent Bone and a minimum of one Child Bone. The Parent Bone serves as the point around which the Child Bone(s) rotate(s). Animating restraints with rotations is not possible without the use of a Parent Bone. |
||||
|
|
|
|
|
|
|
We'll show you how to set up restraints in this temporarily painted car model we've created with seats there that are just perfect for demonstrating standard restraints. |
||||
|
|
|
|
|
|
|
|
||||
|
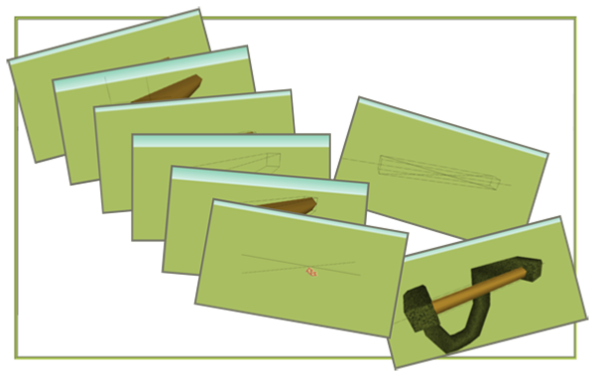
The first thing to do is to settle upon your restraint shape, place it in a suitable location on your seat, and then add a pivot. All the seats in this car face forward so all the pivots will be along the Y axis. |
||||
|
|
|
|
|
|
|
This next slideshow illustrates exactly where we've placed our pivot in relation to the seat and to the restraint. |
||||
|
|
|
|
|
|
|
|
|
|
|
|
|
|
||||
|
|
|
|
|
|
|
Rotations are added to transitions in radians instead of degrees. As mentioned several sessions back, a Google search will bring up links to several unit converters available for download. With a unit converter one would simply enter the degree value of the required rotation into one side of the converter which will tell you in the other side how much that is in radians. For example, if we wanted to enter a transition of 90° we'd enter 90 in the degrees side of the converter. Having already set up the converter to give results in radians the other side will show us that 90° is 1.5707963267949 radians which goes some way towards explaining why the XML templates and some of the information entered into the Importer require so many decimal places. The Importer can take transitions with up to ten decimal places. Some community members are happy with six while others use eight. The templates come with eight decimal places so if you were to follow the templates you'd enter 90° as |
||||
|
|
|
|
|
|
|
1.57079632 |
||||
|
|
|
|
|
|
|
instead of |
||||
|
|
|
|
|
|
|
1.570796327 |
||||
|
|
|
|
|
|
|
Rounding the decimal values up or down is unnecessary work because, with eight decimal places, ten- |
||||
|
|
|
|
|
|
|
So that we may set our rotations accurately we now need to know rotation plus and rotation minus transition directions. This next slideshow makes these directions clear. |
||||
|
|
|
|
|
|
|
|
|
|
|
|
|
|
||||
|
Please note that positive X and Y values are clockwise while positive Z values are counter- |
||||
|
|
|
|
|
|
|
|
|
|
|
|
|
When we create animations with both translations and rotations we have a choice of setting our animations up with the use of a <translate/> or a <rotate/> command. Because of this, care needs to be taken when selecting either of these commands for adding X+Y+Z=0 transitions with a zero time span. A good rule of thumb is if the transition for the bone is made up entirely of rotations then we should also make our zero timed X+Y+Z=0 transition a rotation. This doesn't make any difference to humans because to us an X+Y+Z=0 transition at zero seconds is completely static. To the game engine incorrectly specifying an incorrect <translate/> or a <rotate/> command will cause problems with our restraints in the game remaining at X+Y+Z=0. |
||||
|
|
|
|
|
|
|
When this occurs some or all of your restraints will be at X+Y+Z=0. Some or all of them may or may not be animated. If you experience the problem of your restraints positioning themselves at X+Y+Z=0 and you're certain you've set up your XML properly, nine times our of ten transposing your <rotate/> command with a <translate/> command (or vice versa) will solve this problem. |
||||
|
|
|
|
|
|
|
Although this is a test car our restraints and pivots are already painted with finishing textures because we've pulled them from a completed project and have modified them for this one. |
||||
|
|
|
|
|
|
|
|
|
|
|
|
|
Whether or not it is accompanied by a pivot mesh, the pivot bone is the Parent bone for your restraint. Its location is the base upon which your entire restraints arrangement rests. This next slideshow is the best way to illustrate how to gain accuracy in placing your pivot bone. An accurately placed pivot bone will give every indication that your restraint is actually joined to your car seat while it's rotating. |
||||
|
|
|
|
|
|
|
|
||||
|
|
|
|
|
|
|
To test the movement of your restraint, draw a small cube (Rectangle tool & Push/Pull tool) with one edge of the cube centred on the axle marker we created in the previous slideshow, and then test the restraint around this point with the Rotate tool in your modeler. |
||||
|
|
|
|
|
|
|
|
||||
|
This would be the time to experiment with your restraint and determine the exact angle at which you want them to rotate into their opened positions. During your test when your restraint is in its opened position you may determine the angle by using SketchUp's Protractor tool or by taking a reading from the SketchUp's Measurements Toolbar. Our seats lean back by 10° and we want the opened restraint to resemble the angle of the seat backs so we've settled upon 106.5°. |
||||
|
|
|
|
|
|
|
After you've settled on your restraints arrangement, in your modeler you'll need to focus on which mesh is the Parent mesh and which is the Child mesh. For our car the Parent mesh will be the pivot with the Child mesh being the restraint part that rotates off the pivot. If your restraints arrangement doesn't require a pivot the Parent mesh could be some part of the seat that isn't the restraint. The axle marker makes an excellent place to determine exactly where in the seat the restraint's lead bone (parent bone) should be so you should always work with a pivot and delete it later if not needed. If you choose to delete the pivot be sure not to delete the pivot's axle marker, the marker cage, or the crosshair box. |
||||
|
|
|
|
|
|
|
For our demonstration each animation XML will require two bones with their own corresponding set points. In our modeler, the groups making up the Parent mesh and the Child mesh will each need to be given a unique name. One set of meshes, bones, and their corresponding set points will be required for each. Let's hide everything in the model except the restraints and their pivots. It would be helpful at this time to display the order in which we've chosen for the guests to be seated in the car. |
||||
|
|
|
|
|
|
|
|
||||
|
|
|
|
|
|
|
The next screenshot shows the bones and set points that are required for Peep01. Because SketchUp doesn't infer snap to Text labels we've created a box with crosshairs in it, similar to the way we did when we animated our Sports Car wheels in a previous article and then have placed our Text Label/Effect Bone at the crosshairs in the box. |
||||
|
|
|
|
|
|
|
|
||||
|
After you've done that select the crosshair box & the Effect Bone and make them a group, Later if it turns out we need to make adjustments to the position of our Effect Bone, by moving the crosshair box, even if we have to zoom in so close we can no longer see the Text Label we can precisely move and adjust the Text Label that makes up the bone. If while originally placing the Text Label we've snapped it to the crosshair box, we'll be able to move the Text Label even if we can't see it if we move its corresponding crosshair box. |
||||
|
|
|
|
|
|
|
Following are diagrams outlining the reasoning we've given the bones and set points the names that we've chosen. The first image gives a review of what's needed for the Peep01 pivot. |
||||
|
|
|
|
|
|
|
|
||||
|
The names may seem unnecessarily long and complex but this system works for us because different parts of each the name help us |
||||
|
|
|
|
|
|
|
|
► |
to easily tell them apart in the modeler, |
||
|
|
► |
conveniently check that we've included every bone required for each mesh, |
||
|
|
► |
link the correct texture to the correct bone mesh in the Groups list in the Importer, |
||
|
|
► |
pinpoint the bone's ID in the Edit Animated Model Settings>Bones dialog, |
||
|
|
► |
keep the bones in hierarchical order in the Edit Animated Model Settings>Bones dialog, |
||
|
|
► |
tell at a glance which bone is the parent and how many steps down in that Peep's hierarchy each child bone is, |
||
|
|
► |
link the correct Child bones to the correct Parent bones, and |
||
|
|
► |
assign the correct mesh to each corresponding bone, |
||
|
|
|
|
|
|
|
So as you see each part of each name increases the likelihood we'll get it right the first time around by enabling us to be accurate and efficient with the work we need to do with our car at any stage from the time the car is exported to ASE to the time it is Imported to OVL. |
||||
|
|
|
|
|
|
|
After you've done your pivot prep select all five pivot Text labels and make a group (we'll call it Group A). This second image shows what's needed for the Peep01Restraint. |
||||
|
|
|
|
|
|
|
|
||||
|
When your restraint prep is done select all five restraint Text labels and make another group (let's call that Group B). Next select Group A (the pivot group) along with Group B (the restraint group) and make them into another group (Group W). When you're done, Group W should contain two groups, Group A along with Group B. Group W is now the Peep01 Group. |
||||
|
|
|
|
|
|
|
|
||||
|
Because our car has four seats and we want an animated restraint on each seat we'll need four sets of separately grouped and individually identified matching meshes, bones, and set points. To do this you may either copy and paste or use the Move tool with CTRL. |
||||
|
|
|
|
|
|
|
|
||||
|
Each of these sets will need to be entered individually in the animation XML. For this demonstration we'll make three copies of Group W (the Peep01 group that includes the Pivot bone and set points, and the Restraint bone and set points) so that we'll have four groups. We'll call our four groups Group W, Group X, Group Y, and Group Z. We now have one group for each of the seats in our car. |
||||
|
|
|
|
|
|
|
|
► |
Leave Group W as is. |
||
|
|
► |
In Group X we'll change all the Peep01 Text Label entries to Peep02 entries. |
||
|
|
► |
In Group Y we'll change all the Peep01 Text Label entries to Peep03 entries. |
||
|
|
► |
In Group Z we'll change all the Peep01 Text Label entries to Peep04 entries. |
||
|
|
|
|
|
|
|
About five images back we showed our numbered Peep seating effects along with the restraints. Note the order we've chosen for our guests to be seated in the car. You'd want the Peep effect order for your particular seating arrangement to match the order of your own car's Peep effects. It isn't anywhere carved into stone that RCT3 guests need to file into ride cars from front to back and from left to right. |
||||
|
|
|
|
|
|
|
|
||||
|
We now have four groups of bones along with their required set points. In addition to the reasons we've given above for our particular naming formula, if you follow this system of naming your bones, set points, and meshes it: |
||||
|
|
|
|
|
|
|
|
► |
aids in making it convenient to animate restraints for any car regardless of the number of seats in it, |
||
|
|
► |
will ensure you've created and correctly specified all the bones and set points required, and |
||
|
|
► |
shall, of course, enable you to easily link what's required later on while we're viewing this information in the Importer's Edit Animated Model Settings Window. |
||
|
|
|
|
|
|
|
Next, explode each of your sets once, i.e., explode the Peep01 set once, the Peep02 set once, the Peep03 set, and the Peep04 set. |
||||
|
|
|
|
|
|
|
Then line up each of the four Child bone crosshairs with the pivot crosshair situated in its corresponding seat, i.e., line up the Peep01 Child bone crosshair with the Peep01 pivot crosshair, the Peep02 Child bone crosshair with the Peep02 pivot crosshair, then do Peep03, etc. In this screenshot we've hidden the pivot, hidden the pivot crosshair box, and have left only the pivot crosshair in view. |
||||
|
|
|
|
|
|
|
|
||||
|
Again, note the order of the Child bones matches the order of our Peep seating effects. |
||||
|
|
|
|
|
|
|
Now you need to move everything else, all 32 of the set points and all four of the Parent Bones, to X+Y+Z=0. The crosshair boxes are an enormous help in doing this accurately. Because these will all be centred in the same spot you don't need to worry about moving or arranging anything in a specific order. |
||||
|
|
|
|
|
|
|
|
||||
|
To recap, All the Parent bone crosshairs need to be at X+Y+Z=0 along with all the Parent bone set points and with all the Child bone set points. The Child bone crosshairs will be matched with each of the corresponding restraint pivot crosshairs. |
||||
|
|
|
|
|
|
|
You'll observe by now that from this point on it's going to be challenging to make any changes in SketchUp to the Parent bones and any of the set points so you'd want to be sure you've got everything properly sorted before centring what's required to X+Y+Z=0. If it turns out that you do need to make any edits you can get started confident that they're already grouped and can easily be moved about in organized units. |
||||
|
|
|
|
|
|
|
Finally we need to name our pivot meshes and our restraint meshes so that they match their corresponding groupings of bones and set points. The most convenient way to do that is to hide everything in the model except for the Peep effects (which will serve as a guideline), the Child bones, the pivots, and the restraints. These will all be placed where desired in SketchUp. |
||||
|
|
|
|
|
|
|
|
||||
|
Essentially, what we're doing now is assigning a group to each of the pivot meshes and to each of the restraint meshes. You'd certainly know how to assign groups in SketchUp so all we'll do now is to show you an illustration of how we grouped everything. kSo you may easily see how we've done this we've moved the corresponding Parent bones from X+Y+Z=0, and into this next image, to aid in cross- |
||||
|
|
|
|
|
|
|
|
||||
|
In this car with only four seats some of these names may seem like overkill but if your car has thirty seats this system of naming bones, set points, and meshes will be extremely helpful by the time you get around to sorting Peep10 in the Edit Animated Model Settings window. If while setting this up for yourself it turns out that you move your own Parent bones from X+Y+Z=0 in order to check your work, be sure and return them to X+Y+Z=0 when you're done. |
||||
|
|
|
|
|
|
|
Now that we're through with our bones, set points, pivot meshes, and restraint meshes, unhide everything in your model, delete Andrew and his clones if you haven't already done so, ensure the remaining meshes are grouped accordingly with their individual textures, and export to ASE. |
||||
|
|
|
|
|
|
|
|
||||
|
When the ASE export is completed SketchUp will display exactly what's been exported to ASE. This next table will show what needs to be included in this particular export. |
||||
|
|
|
|
|
|
|
|
|
|
|
|
|
We've also collated for you the textures prepared for this project. Note the names of the textures in relation to the meshes to which they'll be applied. |
||||
|
|
|
|
|
|
|
|
|
|
|
|
|
With our bones, set points, and meshes prepared and our model formatted in ASE we're now ready to create our animation XML's. Further along we'll show you how the Pivot meshes and the Restraint meshes are linked in the Importer's Meshes dialog. |
||||


|
|
|
|
|
|
|
Drag the above toggle to a convenient place on your screen. |
|
|
|
|
The Ultimate CTR Creator


To view the slider, click on a thumbnail.
To view the slider, click on a thumbnail.
| Viewing Full-Sized Images On This Website |
| Effective Park Design: The Best Start For Your Park, Page 2 |
| Master Maps And Guest AI, Page 2 |
| Guest Generation, Park Capacity, And Peep Factory, Page 2 |
| Setting Up And Switching Your Park Entrance, Page 2 |
| Theming Our Stalls & Facilities, Page 2 |
| Our VIP Blue Book, Page 2 |
| Our VIP Blue Book, Page 3 |
| Our VIP Blue Book, Page 4: Spot The VIP's |
| Volitionist's RCT3 Animal Care Guide, Page 2 |
| Volitionist's RCT3 Animal Care Guide, Page 3 |
| Volitionist's RCT3 Animal Care Guide, Page 4 |
| How To Unlock All Campaign Scenarios, Page 2 |
| The Care And Feeding of Custom Downloads, Page 2 |
| The Care And Feeding of Custom Downloads, Page 3 |
| The Care And Feeding of Custom Downloads, Page 4 |
| RCT3 Cheats & Unlockables, Page 2 |
| Options.txt Flags, Page 2 |
| Options.txt Flags, Page 3 |
| RCT3 Keyboard & Mouse Controls: Advanced |
| RCT3 Keyboard & Mouse Controls: Freelook |
| RCT3 Keyboard & Mouse Controls: Isometric |
| RCT3 Keyboard & Mouse Controls: Normal |
| Guests Departing The Station But Not Returning |
| Guests Knocked Over |
| People Spilling Down Stairs |
| Lost Staff |
| ReAppearing Invisible Vendors |
| Park File Thumbnails |
| RCT3 Freezes |
| Earthquakes and Plumbing |
| The Importer |
| SketchUp |
| Reviewing RCT3’s History, Page 2 |
| Chris Sawyer, Page 2 |
| Showcase!: Fall 2020, TNS Pool Paths & TNS Pool Terrain, Page 2 |
| Showcase!: Fall 2020, TNS Pool Paths & TNS Pool Terrain, Page 3 |
| Showcase!: Fall 2020, TNS Pool Paths & TNS Pool Terrain, Page 4 |
| Showcase: Spring 2019 - DasMatze's Fences & Railings, Page 2 |
| Showcase: Spring 2019 - DasMatze's Fences & Railings, Page 3 |
| Showcase: Spring 2019 - DasMatze's Fences & Railings, Page 4 |
| Showcase: Fall 2018 - L-33/Lee, Page 2 |
| Showcase: Fall 2018 - L-33/Lee, Page 3 |
| Showcase: Fall 2018 - L-33/Lee, Page 4 |
| Showcase: Spring 2018 - Spez Mies Wall Set, Page 2 |
| Showcase: Winter 2017 - Mr. Sion's Tiki Bar, Page 2 |
| Showcase: Fall 2017 - Polynesian Panic, Page 2 |
| Hall of Fame: Belgabor's Invisible Doodads |
| Hall of Fame: Spice's Invisible Pool CS |
| Hall of Fame: GTT's Hedge Maze |
| Hall of Fame: GTT's Glas Labyrinth |
| Hall of Fame: Joey's Park CleanUp |
| Hall of Fame: GTT's Hedge Maze, Page 2 |
| My Adventures In SketchUp |
| CSO's I Have Imported |
| TexMod Customized Add-Ins |
| My Parks |
| Videos |
| Screenshots |
| Advertisement Land |
| Intrepid: A Revolution In Design |
| Structure And Ride Supports Set |
| CSO Study: GTT’s Hedge Maze |
| Wonderland Themed Playing Card Railings |
| Architectural Chess |
| Mini Chess |
| Planters 'n' Fountains Set |
| Intrepid: A Revolution In Design, Page 2 |
| Intrepid: A Revolution In Design, Page 3 |
| Intrepid: A Revolution In Design, Page 4 |
| Structure And Ride Supports Set, Page 2 |
| Café, Update 1 |
| Path Add-Ons, Update 1 |
| Planters And Pool Fencing, Page 2 |
| Landscaping And Park Grounds, Page 2 |
| Walls, Tunnels, And Fences, Page 2 |
| Decking, Stairs, And Balustrades Set, Page 2 |
| Decking, Stairs, And Balustrades Set, Page 3 |
| CFR & CTR CSO's, Page 2 |
| CFR & CTR CSO's, Page 3 |
| CFR & CTR CSO's, Update 1, Page 1 |
| CFR & CTR CSO's, Update 1, Page 2 |
| TexMod Tutorial |
| My TexMod Skies |
| TexMod MakeOvers For My Park |
| TexMod MakeOvers For My Park, Page 2 |
| Vanguard West |
| Vanguard West: Financial Report |
| Hillside On The Lake |
| Hillside On The Lake: Financial Summary |
| A Woodland Clearing |
| Vanguard West, Page 2 |
| Vanguard West, Page 3 |
| Vanguard West, Page 4 |
| Vanguard West, Page 5 |
| Vanguard West, Page 6 |
| Vanguard West: Financial Report, Page 2 |
| Vanguard West: Financial Report, Page 3 |
| Hillside On The Lake, Page 2 |
| Hillside On The Lake, Page 3 |
| Hillside On The Lake, Page 4 |
| Hillside On The Lake, Page 5 |
| Hillside On The Lake, Page 6 |
| Hillside On The Lake: Financial Summary, Page 2 |
| Hillside On The Lake: Financial Summary, Page 3 |
| Hillside On The Lake: Financial Summary, Page 4 |
| Hillside On The Lake: Financial Summary, Page 5 |
| A Woodland Clearing, Page 2 |
| Screenshots, Page 2 |
| Screenshots, Page 3 |
| Screenshots, Page 4 |
| Screenshots, Page 5 |
| Advertisement Land, Page 2 |
| Collaborations - Custom Content |
| Collaborations - Parks |
| L-33's POE Building 4 Set |
| RCT2 Wonderland Themed CSO's |
| The Crüe |
| L-33's POE Building 4 Set, Page 2 |
| RCT2 Wonderland Themed CSO's, Page 2 |
| POE Building 4 Set Presentation Park |
| POE Building 4 Set Presentation Park, Page 2 |
| POE Building 4 Set Presentation Park, Page 3 |
| POE Building 4 Set Presentation Park, Page 4 |
| POE Building 4 Set Presentation Park, Page 5 |
| How To Use Park CleanUp, Page 2 |
| How To Use Park CleanUp, Page 3 |
| Park Admission, Ride Pricing, And EI&N, Page 2 |
| Maximizing Your Small Park's Real Estate, Page 2 |
| Park Shuttle Configurations, Page 2 |
| Elevated Coaster Stations And Access Options, Page 2 |
| Suspended Pools And Guest Access Options, Page 2 |
| Terrain Painting - Artistry In Landscaping, Page 2 |
| Terrain Painting - Artistry In Landscaping, Page 3 |
| How To Build A Great Park, Page 2 |
| Optimize Your System And Enhance Your Gaming Experience, Page 2 |
| Custom Scenery |
| TexMod ReTexture Packs |
| Miscellaneous |
| Parks, Scenarios, & Sandboxes |
| Coasters, Rides, & Attractions |
| Structure And Ride Supports - Original Concrete |
| Structure And Ride Supports - Hewn Brick |
| RCT2 Wonderland Themed Set |
| RCT2 Revival Crüe Chess |
| FTA's Invisible Stall With Invisible Vendor |
| RCT3 Launch Screen Slideshow Template |
| Dark Ride Enclosure Toppers |